Web Stories are a web-based version of the popular Story format that you’ve probably seen on social media sites.
They are a visual storytelling format for the web, which makes it possible to create tappable, visual narratives that blend video, audio, images, animation and text.
You can use this storytelling tool on your own WordPress website to reach more people and engage your audience (Google supports Web Stories, so people can find your published stories across Google Search, Google Discover, and Google Images).
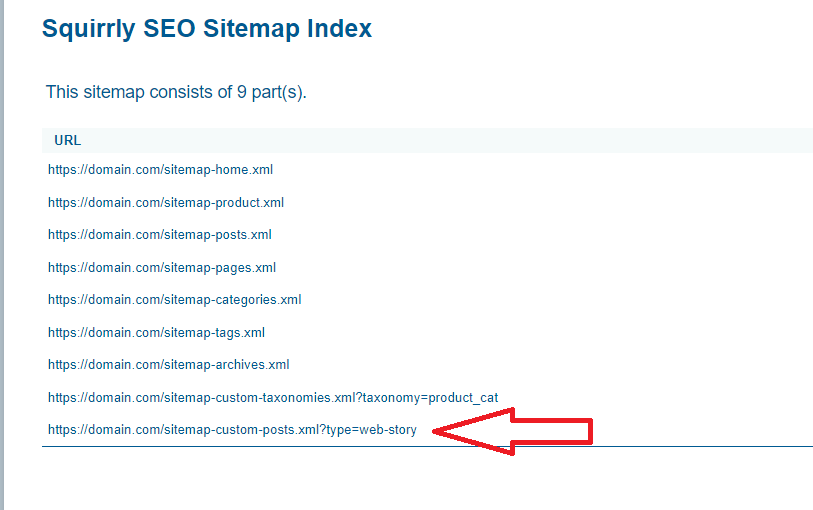
To make it easier for Google to discover your Web Stories, it’s important to include this post type in your sitemap.
In this short tutorial, we’re going to show exactly how to do this using Squirrly. Let’s get to it!
STEP 1: Install a plugin that allows you to easily create Web Stories
Its drag-and-drop editor makes it easy to create beautiful stories – without any coding involved.
STEP 2: Go to Squirrly > Optimize > Automation
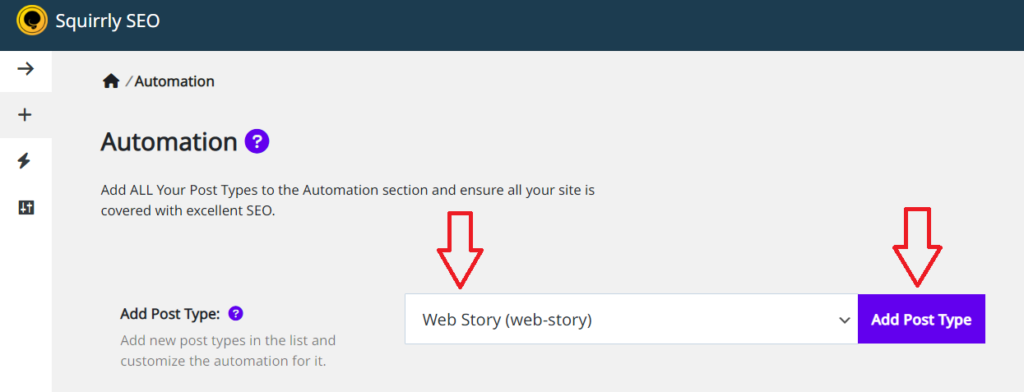
Then click Add Post Type and add Web Story (web-story) as a new post type for SEO Automation.
(as shown in the screenshot below)
STEP 3: Make sure the Web Story Post Type is included in the Sitemap
For this, you need to go to Squirrly > Optimize > Automation > Configuration.
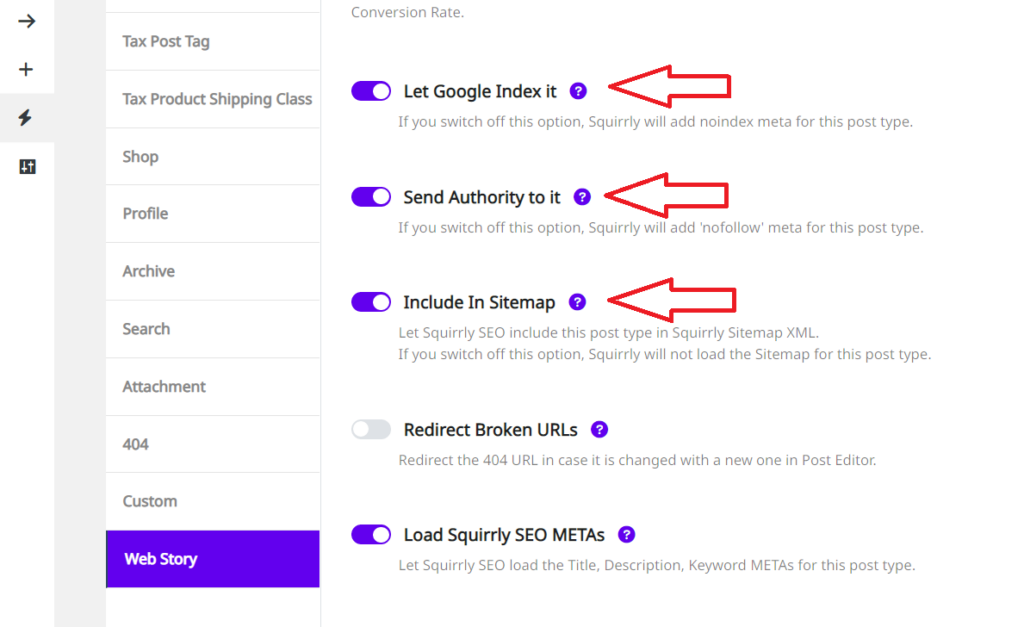
Select Web Story as your post type and make sure the following options are turned ON:
Let Google Index it
Send Authority to it
Include In Sitemap
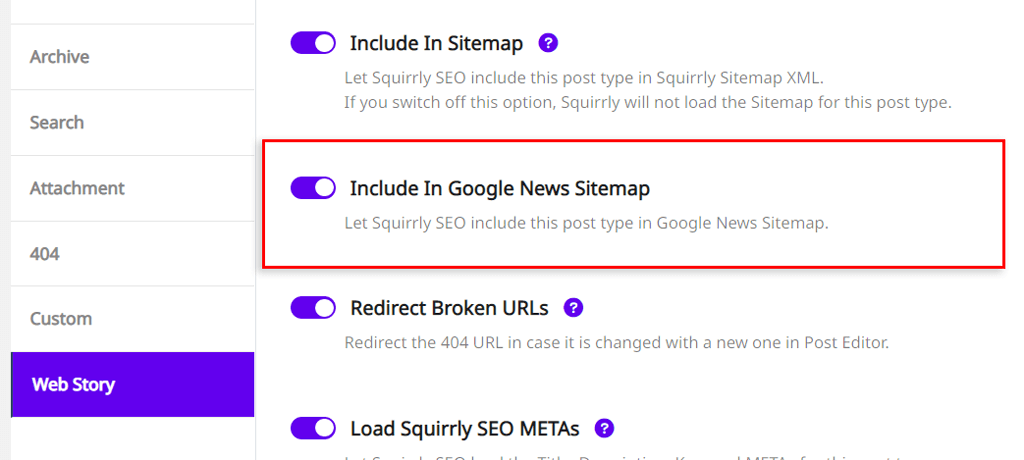
If you want the Web Story Post Type to also be added in Google News Sitemap (the sitemap Google News reads), make sure that the option: Include In Google News Sitemap is also turned ON. This option shows only when the Google News sitemap is turned on in Squirrly > Technical SEO > Tweaks & Sitemaps > Sitemap XML.
(as shown in the screenshot below)
STEP 4: Go to Squirrly > Technical SEO > Tweaks & Sitemaps > Sitemap XML
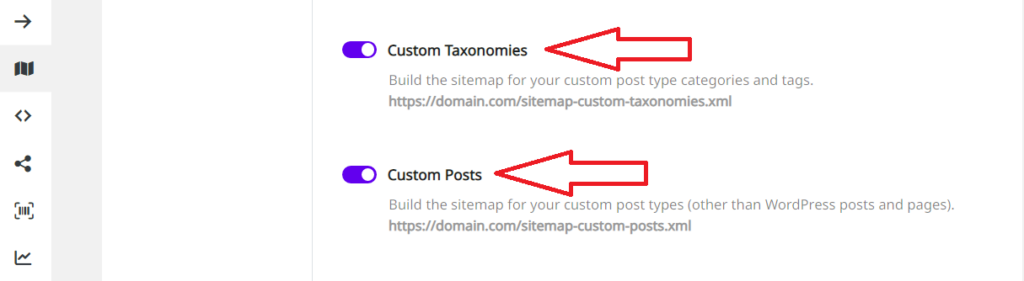
Activate the following options for Custom Post Types:
Custom Taxonomies
Custom Posts
(as shown in the screenshot below)
Don’t forget to save your settings!
☑️That’s it!
By following these steps, you can successfully include Stories in your sitemap using Squirrly.
The last rule covers the other files: sitemap-home.xml, sitemap-product.xml, sitemap-news.xml and sitemap-attachment.xml.
The paginated sitemaps keep working with these rules. The sitemap index links to addresses such as sitemap-posts.xml?page=2, sitemap-custom-posts.xml?type= followed by a post type name, or sitemap-custom-taxonomies.xml?taxonomy= followed by a taxonomy name. NGINX matches the rewrite on the path only and adds the original page, type and taxonomy parameters after sq_feed, so you don’t need a separate rule for them.
If your WordPress permalinks are set to Plain, Squirrly uses addresses such as /?sq_feed=sitemap-post and you don’t need these rules.
After you reload NGINX, open https://example.com/sitemap.xml (with your own domain) and click a few of the sitemaps it lists, including sitemap-tags.xml and a page 2, to check that each one loads.
NOTE! In case you are not 100% sure where to add these rules, we recommend reaching out to your web host or server admin and asking for further assistance.
Still Need Help?
If you’ve added the rewrite rules in the correct file, and you still encounter issues, they are likely linked to other settings on your server. You can always reach out to our support team via one of the available channels whenever you need more assistance.
What’s the Full list of JSON-LD Structured Data/Schema Markup available in Squirrly?
Why JSON-LD?
JSON-LD makes data more accessible by annotating elements on a page, structuring the data. Not just for humans, but also for machines, the kind of machines Google is powered by. Google’s crawlers can miss information that people would find important.
By using JSON-LD, you can highlight various important details of your website to search engines.
Google uses JSON-LD structured data (JavaScript Object Notation for Linked Data) that it finds on the web in order to understand the content of the page, as well as to gather information about the web and the world in general.
In terms of SEO, JSON-LD uses the Schema.org vocabulary. JSON-LD is considered to be simpler to implement, thanks to the ability to simply paste the markup within the HTML document.
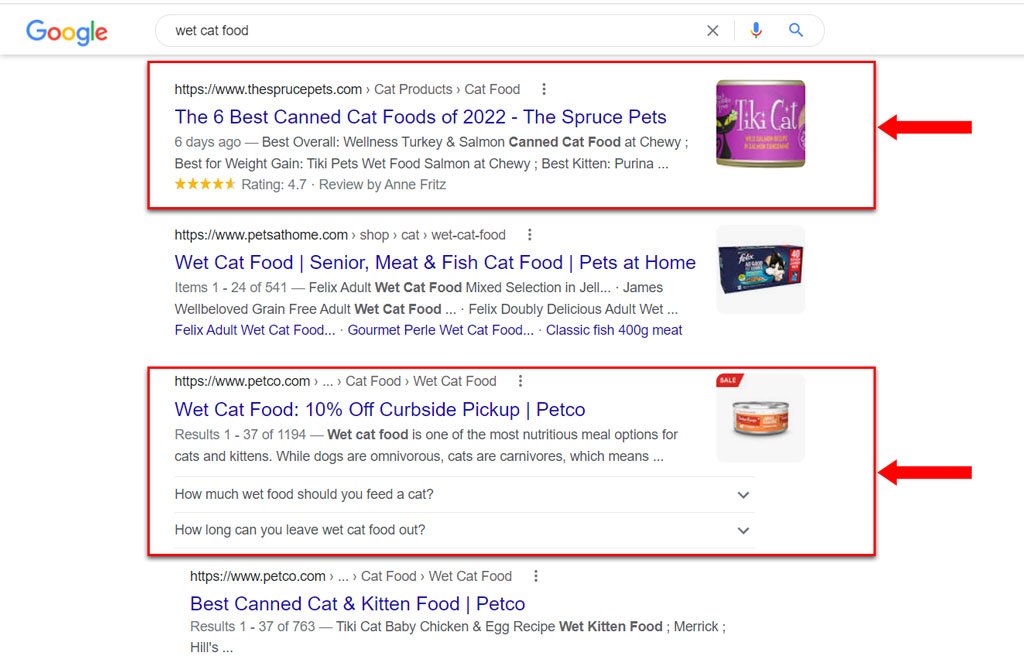
JSON-LD structured data influences how Google will create rich snippets for your URLs. Google uses the JSON-LD for rich snippets and featured snippets and to populate the search results with more data from each website like Breadcrumbs, Reviews, Article data, or Company Info.
Does JSON-LD as a semantic SEO markup solution sound complicated?
With Squirrly, you set it up from forms in WordPress. No coding skills required.
Organization/ Company Schema
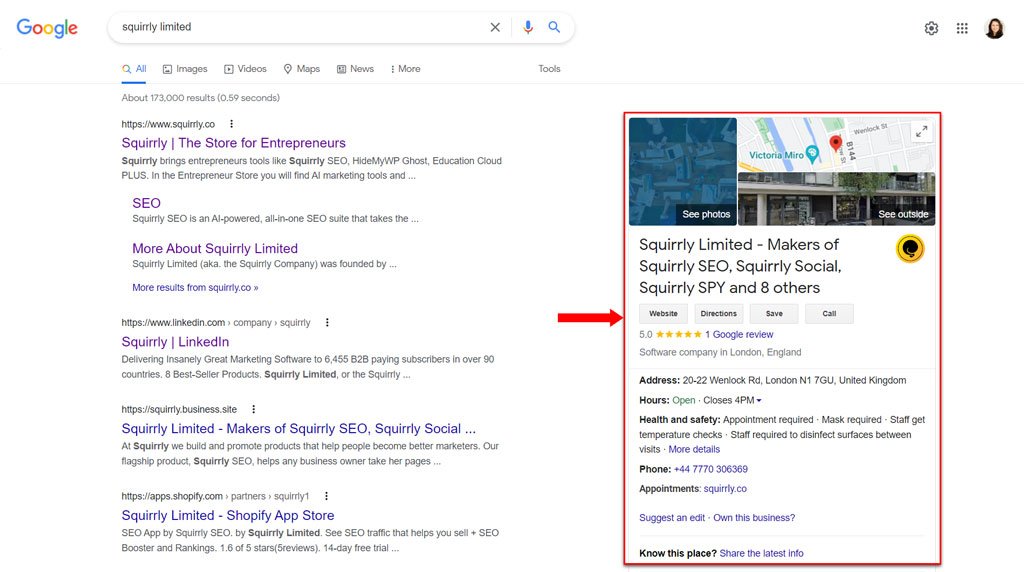
Have you ever wondered how some businesses or even your competition manage to have extra information when displayed in the search engine results page? Or how Google knows to generate that interesting additional information which appears on the right side?
It’s all about structuring the data! And with the JSON-LD feature that Squirrly SEO offers, you can do just that.
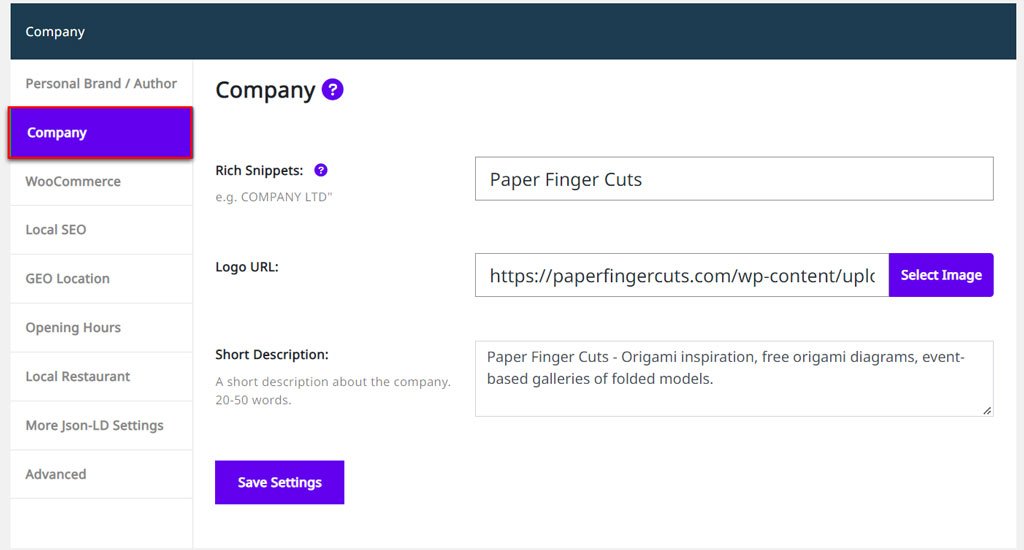
Go to Squirrly > Technical SEO > Rich Snippets > Company and fill in the fields.
Next time your website will get crawled, Google will be able to offer your future customers that additional information which can make a difference.
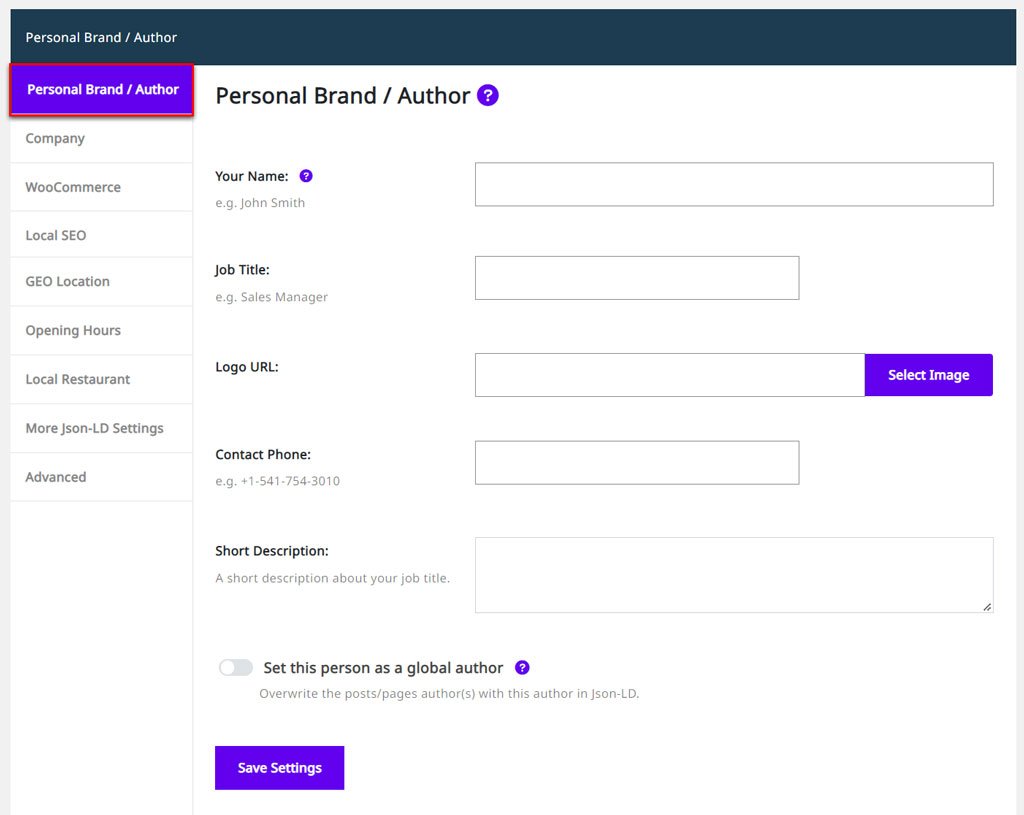
If your website is a personal website, add the author data to build a valid JSON-LD. Go to Squirrly > Technical SEO > Rich Snippets > Personal Brand / Author and fill in the fields.
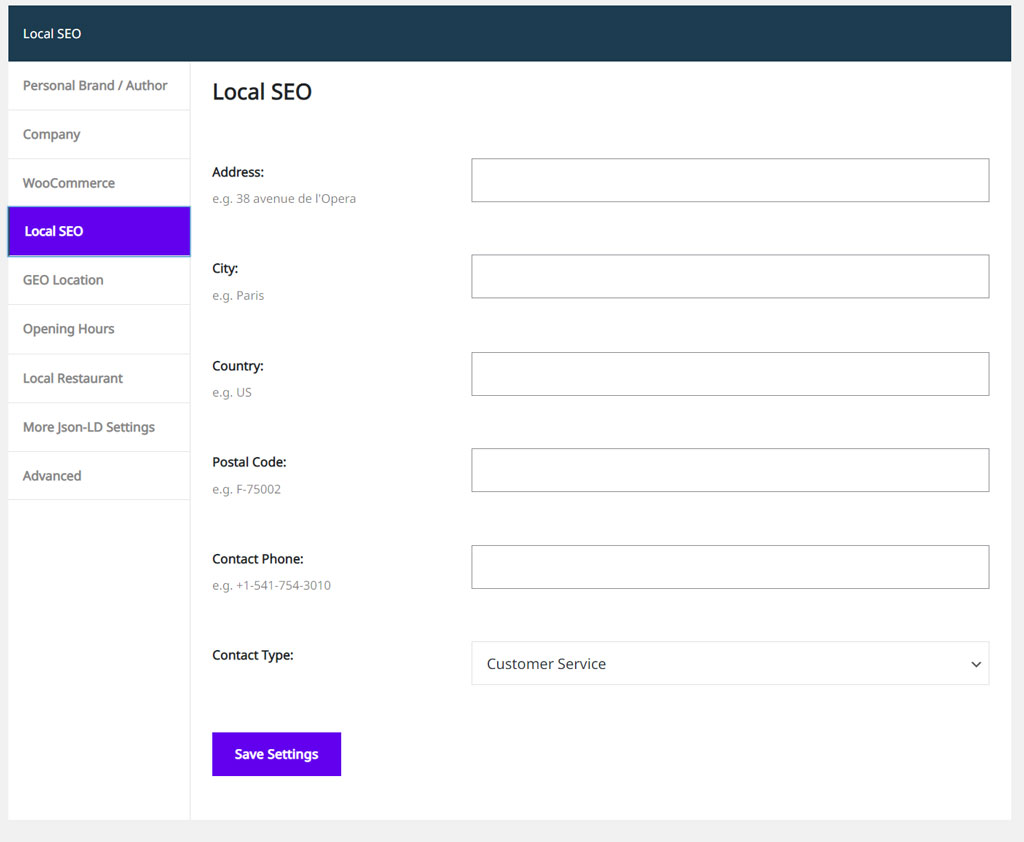
set up GEO Location in the GEO Location tab (tell Google the exact location of your business)
define Opening Hours in the Opening Hours tab (tell Google your business hours for every day of the week)
Local Restaurant Schema
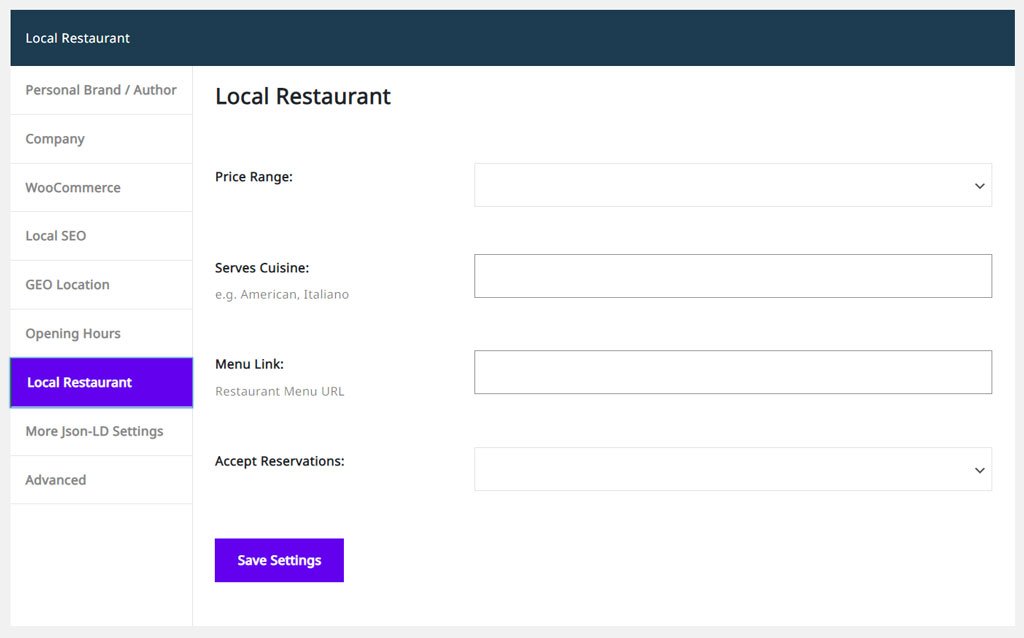
If you have a local restaurant, use the Local Restaurant tab to tell Google about:
your restaurant’s price range,
the type of dishes you serve,
and whether your restaurant accepts reservations or not.
If you have an online menu, you can also link to it.
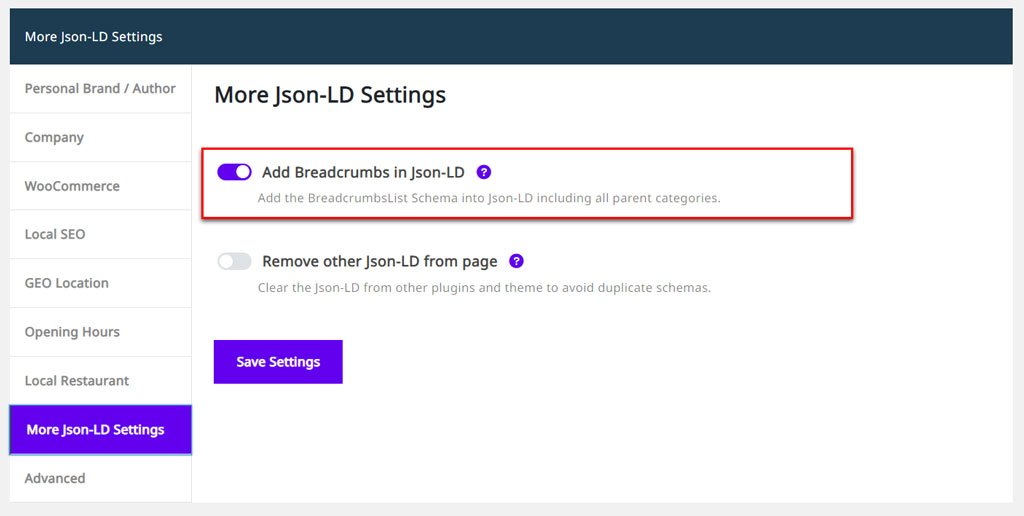
Breadcrumbs Schema
A breadcrumb trail on a page specifies the page’s position in the site hierarchy. It helps users understand where they are on a site and move around it.
Squirrly SEO has 30 JSON-LD types. Depending on your post type, you can use Squirrly to create:
Schema for Website
Schema for Article
Schema for Newsarticle
Schema for FAQ Page
Note! By default, Squirrly loads the non-formatting Title and Description to build the FAQ Schema.
For Custom HTML Schema in Squirrly, you can install the free Advanced Custom Field (ACF) plugin and follow the tutorial for creating custom FAQ Schema for each page. (you can learn more about this here)
Some page types only offer the types that fit them. Categories, tags, archives, search and 404 pages get Website. The home page and the shop page get Website, Local Store and Local Restaurant. WooCommerce products get Product and Video, and author pages get Profile.
With the Squirrly SEO Advanced Pack and its Custom Rich Snippets feature turned on, you get the Advanced Pack list of schemas instead (it adds types like FactCheck and QAPage), and you can add several schemas to one page and edit every field. You can also build a schema once and reuse it with Reusable Schemas.
Add CUSTOM Structured Data to Build Any kind of Schema You Need
You can add custom structured data for anything that’s NOT handled automatically by Squirrly SEO.
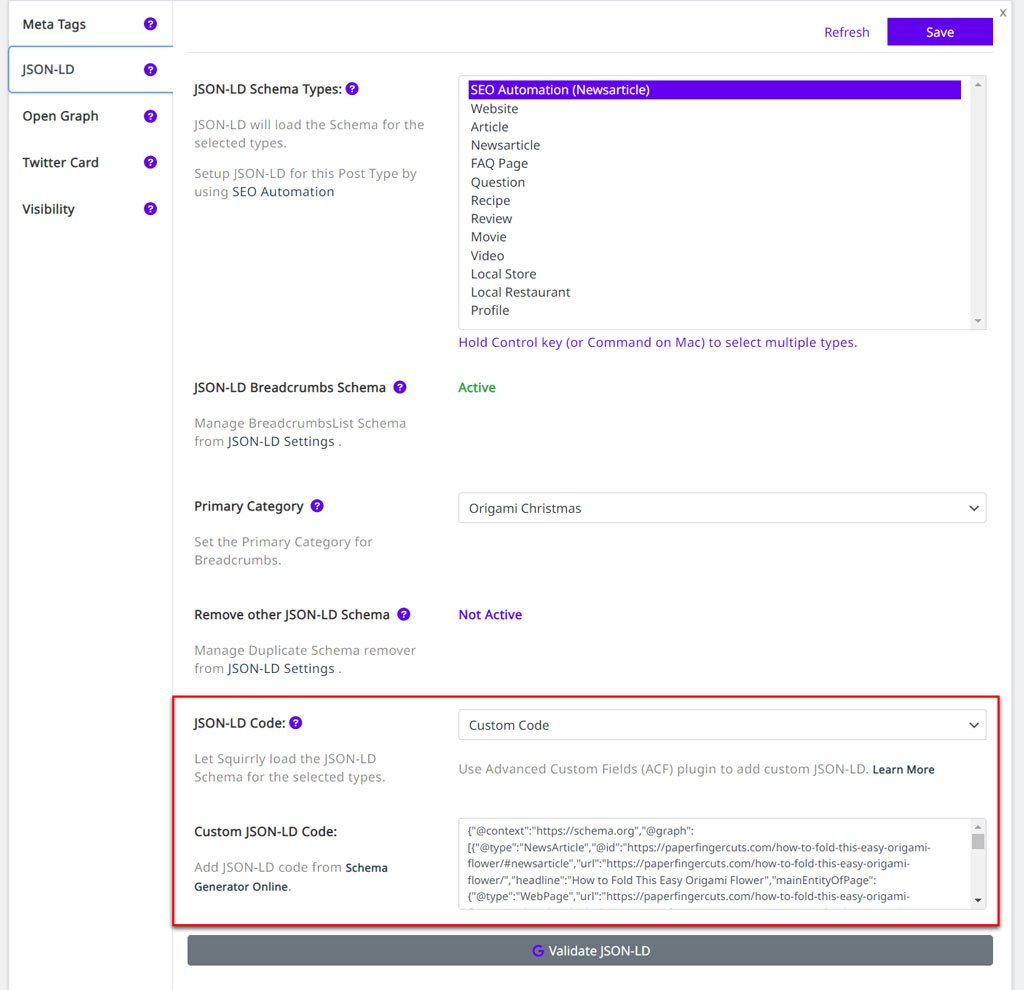
To add it, open the SEO Snippet of the page, go to the Rich Snippets tab, then the Custom Schema tab, and set Custom Schema to Custom Code. Paste your code in the Custom JSON-LD Code field. The field links to a free Schema Generator Online. Custom Code replaces the automatic schema for that page, so we recommend leaving this on (Auto) unless you are an SEO expert and know exactly what you are doing.
These options are in Squirrly > Technical SEO > Rich Snippets > WooCommerce:
Improve the WooCommerce Product and Orders schema by enabling Squirrly to add the required data;
Add default data for JSON-LD AggregateRating, Offers, Sku, MPN when they are missing from the product to avoid GSC errors;
Enable Squirrly to include additional metadata fields (MPN, GTIN, EAN, UPC, ISBN) in the WooCommerce product Inventory section, plus a Brand Name field.
Redirect Features: What Does Squirrly Offer for Creating Redirects?
Squirrly SEO offers an Advanced Redirects Module that allows you to set up the proper redirects, keep a log of all redirects implemented on your site, monitor 404 errors, and much more. It comes with the Squirrly SEO Advanced Pack and lives in Squirrly > Redirects. Check out this in-depth tutorial for more details.
In addition to the Advanced Redirects Module, Squirrly also provides the following features for redirection.
automatic redirects (at URL change)
redirecting 404s
redirects in Bulk SEO Settings and in the SEO Snippet for each page
attachment page redirects options
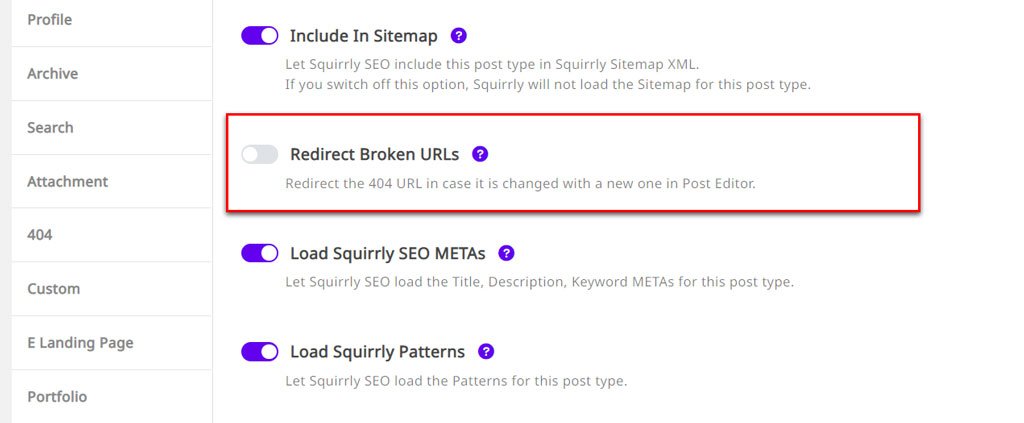
Redirect Broken URLs
To reach this, go to: Squirrly > Optimize > Automation > Configuration and open the tab of the post type. The same option has a shortcut card, Redirect Broken URLs, in Squirrly > Technical SEO > Tweaks & Sitemaps > SEO Links and Redirects.
How does this option help you?
Say you’ve just created a new article. In this case, by default, the slug (the part of a URL which identifies a particular page on a website) will be generated based on the title of that article.
However, it could be that you created that title before knowing which keyword you want to optimize your article for, and didn’t include it in the title.
If you try to add the keyword in your article after the slug was created, it still won’t show in the slug. You can modify the slug after the article was published, but in this case, the first slug you created will link to a 404 Page.
It could also be that your article has already been indexed by Google and has authority. In this case, it can be very detrimental to your site to modify the slug and have the original link send people to a 404 Page.
And this is where the Redirect Broken URLs option comes in handy.
By switching this to ON, Squirrly will apply a 301 redirect, recommended for SEO because it’s a permanent redirect that passes full link equity (ranking power) to the redirected pages.
This helps ensure that in case a certain URL has been modified, the original URL will automatically send people directly to the modified one (while also passing authority), without having to install a redirect plugin on your site.
Furthermore, this will NOT impact the Authority of your page or negatively affect the page’s position in Google.
In the default settings, this option is ON for Posts, Pages and Products and OFF for the other post types. Check it on each tab after you add a custom post type. See Redirect Broken URLs in Automation.
404 Redirects
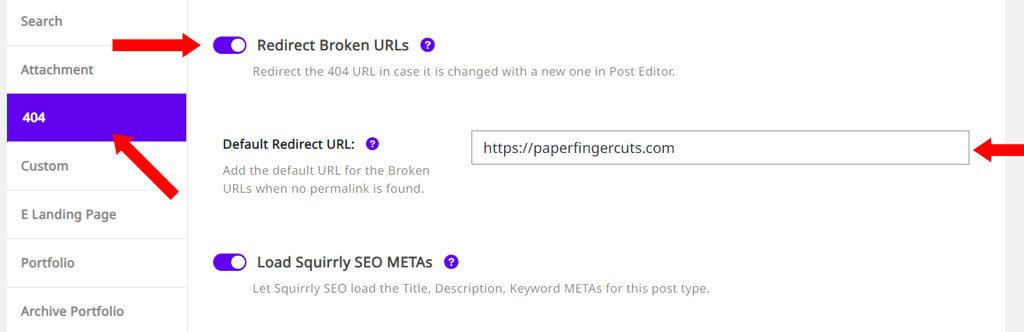
For the 404 Post Type, Squirrly offers the option to configure a Default Redirect URL to redirect the broken URLs when no valid permalink is found.
Go to Squirrly > Optimize > Automation > Configuration, open the 404 tab and scroll down to Default Redirect URL to set this up. The field starts with your home page URL.
Note that in order to be able to use a default redirect URL, the option Redirect Broken URLs needs to be enabled for the 404 Post Type. (as shown in the screenshot below)
What about a 404 Monitor?
The Advanced Redirects Module has one. With the Squirrly SEO Advanced Pack installed and 404 Monitor turned on in Squirrly > Redirects > Settings, Squirrly logs the addresses that returned a 404 and when. Add a rule for the ones that should point to a live page. See 404 Monitor.
301 Move Permanently
A 301 redirect is a permanent redirect that passes full link equity (ranking power) to the redirected page. It’s also a way to tell search engines that a page it is trying to reach has been permanently moved to a new location.
Because it passes full ranking power to the redirected page, a 301 redirect is recommended for SEO.
Using Squirrly, you can easily set up a 301 redirect for any URL on your site. This feature is useful for redirecting your website pages to new URLs from old URLs.
You can use it when a page on your site has been permanently moved or removed from your website, and you want to point the user to a new page instead.
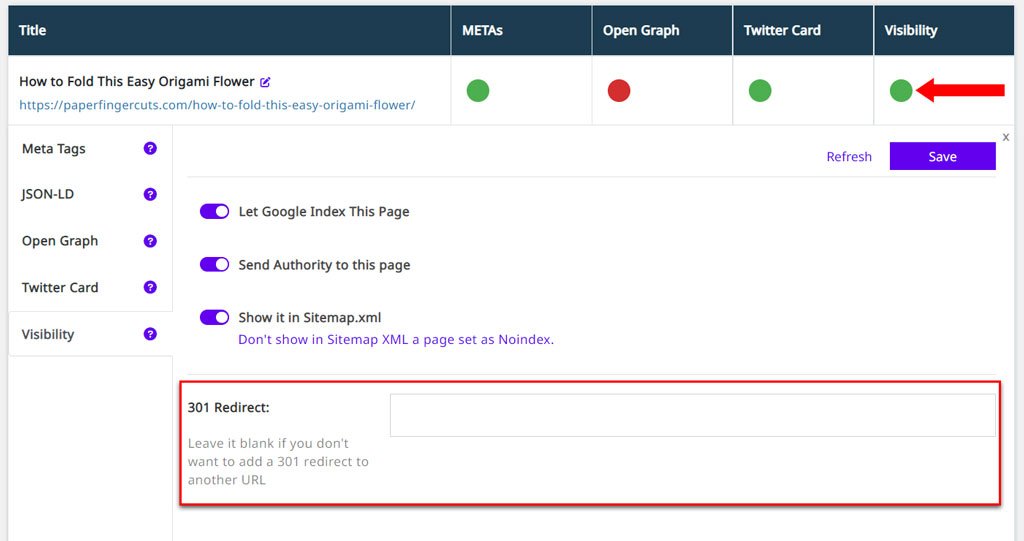
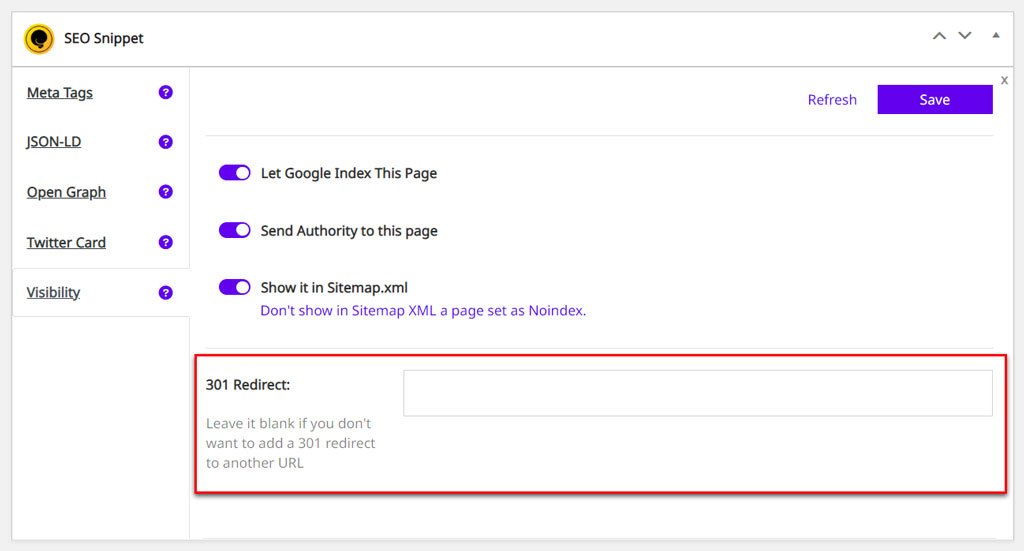
Without the Advanced Pack, the 301 Redirect field is in the Visibility tab of the SEO Snippet, in SEO Expert mode. You find it in:
Snippets in Bulk SEO
Note that setting up a 301 redirect will cause the Element from Visibility to turn RED (this is meant to notify you of the fact that search engines will NOT index that URL on your site).
SEO Snippets when Editing Page
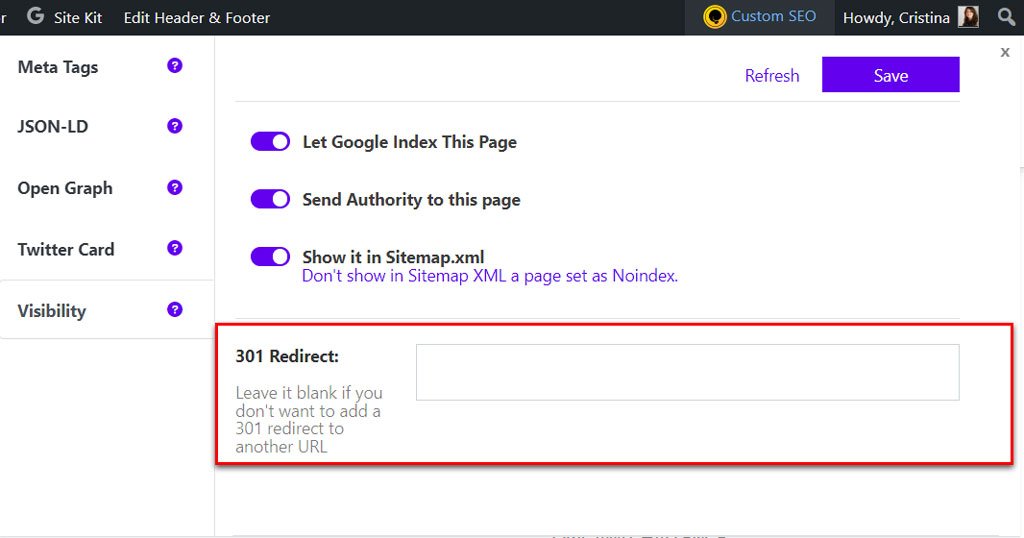
Snippets on the Front-End
To create a 301 Redirect, all you have to do is add a VALID URL in the dedicated sections.
With the Squirrly SEO Advanced Pack installed, the Visibility tab shows a Manage Redirects link instead of the 301 Redirect field. It opens Squirrly > Redirects, where you add the rule for that URL.
Redirect Attachments Page
WordPress creates a separate media attachment page for every file you upload to the Media Library.
The page has its own automatically-generated URL and ONLY contains the media content.
Having these types of pages indexed by Google can hurt your SEO in a few different ways, but you can stop Google from indexing your WordPress image attachments pages by redirecting them to the actual images.
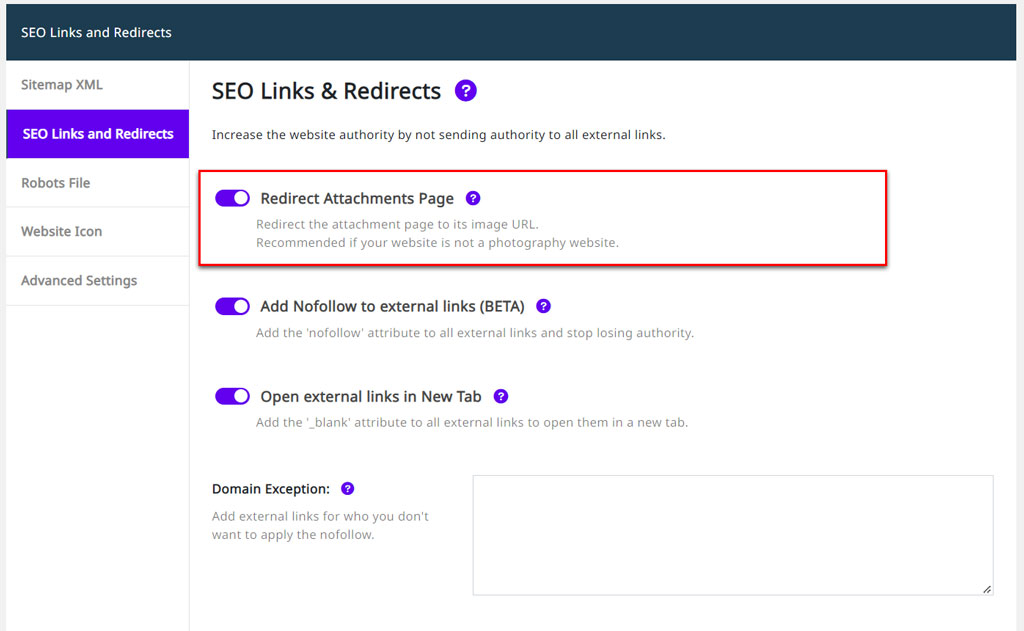
Using the Redirect Attachments Page option from Squirrly (Squirrly > Technical SEO > Tweaks & Sitemaps > SEO Links and Redirects), you can do this with one move. The same switch is on the Attachment tab of Squirrly > Optimize > Automation > Configuration.
When the toggle is switched to the right, the Redirect Attachments Page option is active.
Having this option active means that when someone lands on one of your attachments pages, they will be redirected to the attachment itself.
However, since we are always innovating, we are also experimenting with new ways to help the overall CX (customer experience).
In case you have purchased a Code from us (for special access):
Please follow the instructions you were provided with and see that some codes only work for brand new accounts. Which means, you will need a new account with a different email address.
Remember: some special codes might only be for new accounts created using the special links you are provided with when purchasing your code. They send you to create the account using a special form. Please use that one, to ensure that your account will work well.
Contact support@squirrly.co if you need extra help.
What is License Stacking?
License Stacking means buying more than one Squirrly plan under the same Squirrly account, so the account limits add up. The history below covers 2017 to early 2021, with the numbers from that time.
Today, the limits of your own account show in the Squirrly account menu in WordPress (click the plan name to open your account in Squirrly Cloud). See Squirrly Cloud App: your plan in the account menu. For current plans and prices, check the pricing page.
Updates to Stacking
Ever since 2017, when we shifted from Squirrly SEO 2016 to Squirrly SEO 2017, we removed all Unlimited Websites plans from our catalogues (except for clients who were already on those plans).
Of course, there were still agencies, freelancers, and bloggers with multiple projects (over 7) and they wanted more than the 7 sites offered by the classic PRO version.
The Agency plan for Squirrly SEO offered up to 50 sites, but for some clients that was too much of a stretch.
So, by the time we released Squirrly SEO 2018 (in April 2017), the concept of License Stacking was born.
Not exactly an innovation, since AppSumo (and all their software partners) were already offering stacking deals. The more packages you bought, the higher the account limits got.
This was a good thing for most of our users.
Until the end of 2020, our users bought multiple licenses under the same account in order to improve:
maximum number of sites under the account.
Sadly, this was all it did, and we finally had time to give license stacking a well-deserved upgrade.
At the end of 2020, we experimented with a new way of stacking subscriptions and licenses that goes beyond just improving the total number of sites under the account.
With stacked licenses, you could get on PRO Plans (on top of the website limits):
more keyword researches/account
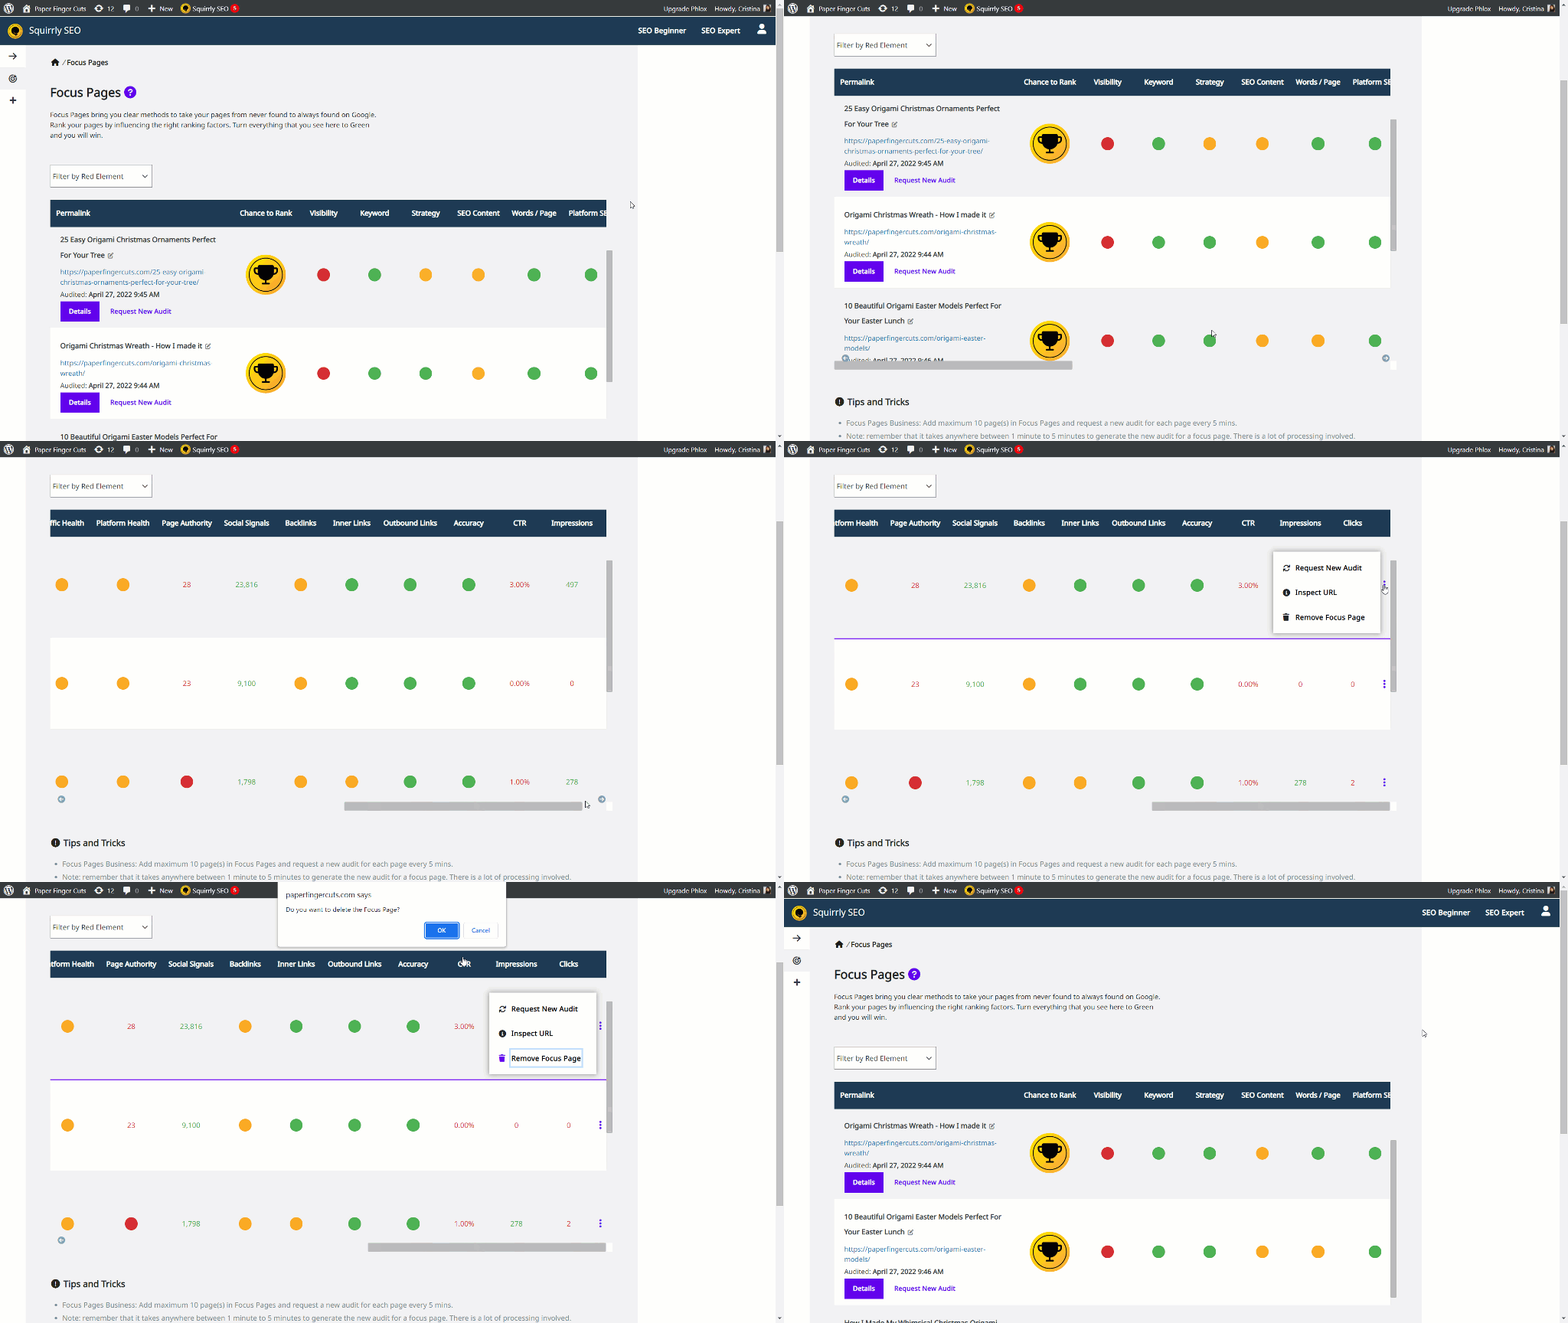
more focus pages/account
And on the Business Plans, by stacking multiple subscriptions (or even by stacking a PRO with a Business Plan) you get:
more SERP Checker credits (upgraded from the initial 3,000 position checks/month)
a lot more focus pages/account
See this image (below) for one of our accounts where we stacked 3x Business Plan subscriptions:
(14 sites already added to it, and about 3,000 SERP Checker credits already used this month; therefore, what’s written there is the remaining things for Jan 2021)
^^ As you can see this is a very solid plan for very active sites and multiple projects. Which could have never been covered by the basic Business Plan.
With the upgraded License stacking system, that account got a lot more than just 21 total sites.
So, depending on the plans you combined, you could increase:
total websites / account
total keyword research credits/account
total number of focus pages/account
total SERP Checker credits/account
Why is there a limit of Focus Pages in Squirrly SEO?
The limit of Focus Pages per site is something that’s meant to help you stay focused on the work that needs to be done so that you can more easily reach your ranking goals.
Focusing on a few Focus Pages at once is more than enough as you have to complete all task associated with Google’s top ranking factors.
Once you start ranking in the top 10 with a Focus Page, you can change the Focus Page and focus on another Focus Page.
There are big companies that have teams working with ~ 5 Landing Pages per website. There is a huge amount of work for each Focus Page to rank it in the TOP 10 of Google, so adding more of them will just make your SEO Strategy harder to execute.
How Can I Change My Squirrly Account?
In this short tutorial, we’re going to show you how to change an account that’s currently connected to Squirrly SEO. This may come in handy in situations such as:
you’ve created a Squirrly SEO account using the wrong email address, want to disconnect it from Squirrly SEO and connect with the correct email address
you want to change an old account used to connect to Squirrly with a new account
Disconnecting doesn’t delete your SEO work. Your titles, descriptions and settings stay in WordPress. Keyword Research, Focus Pages, audits and rankings stop until the site is connected again.
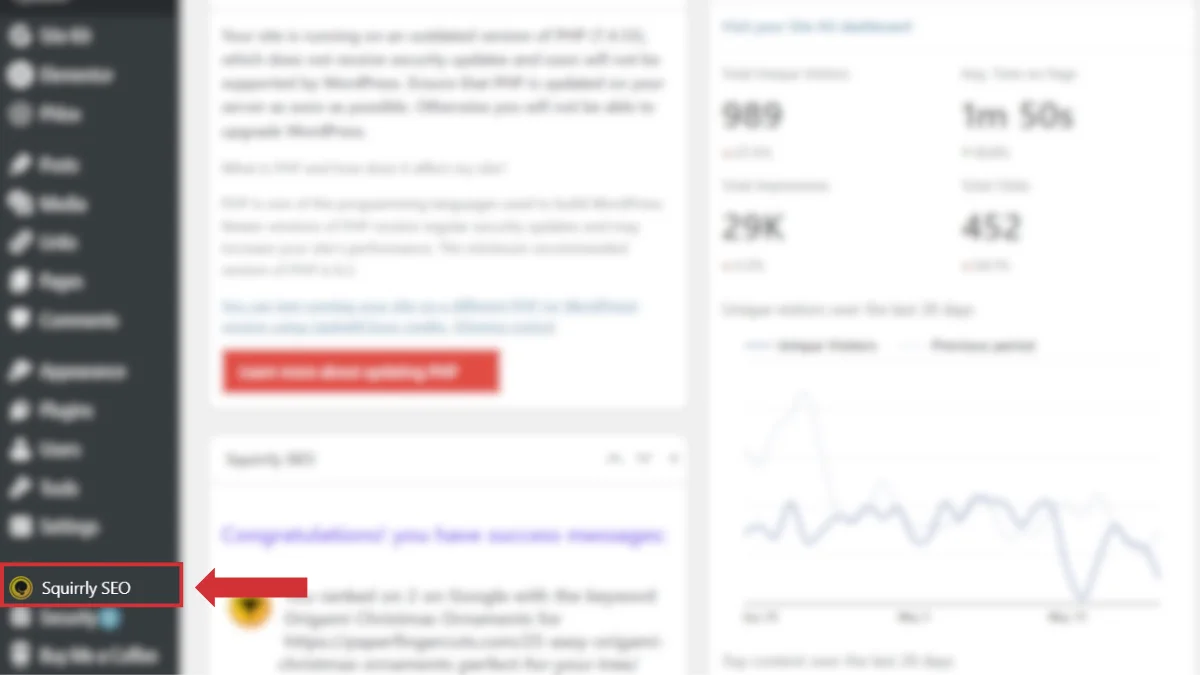
Step 1: In your WordPress Admin Menu, open the Squirrly SEO plugin
From the left-hand menu in your WordPress dashboard, click on Squirrly.
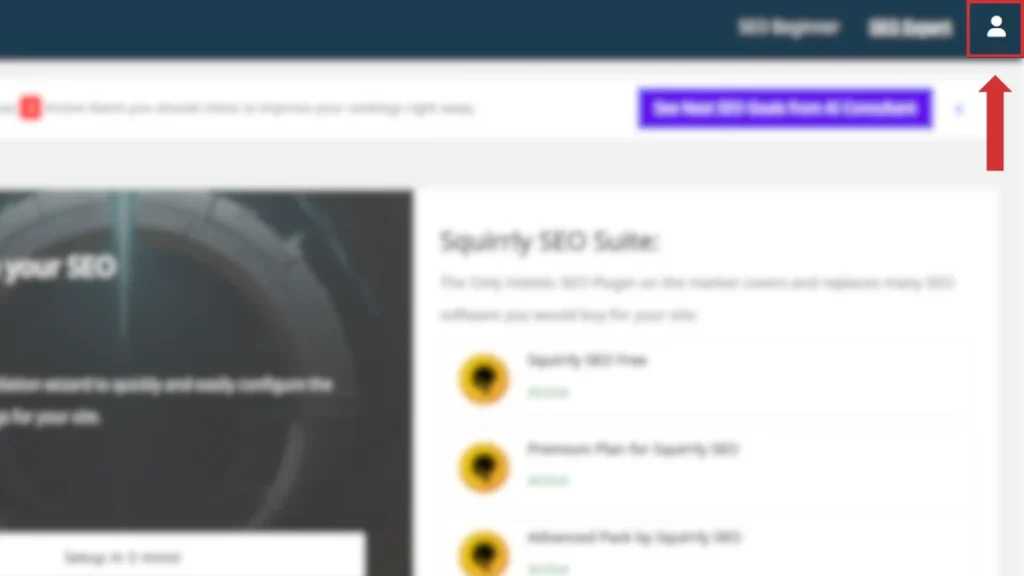
Step 2: Open the account menu
Click the person icon at the right end of the dark Squirrly header, next to SEO Beginner and SEO Expert. The account menu opens with the email address of the connected account at the top. The icon shows only to WordPress administrators.
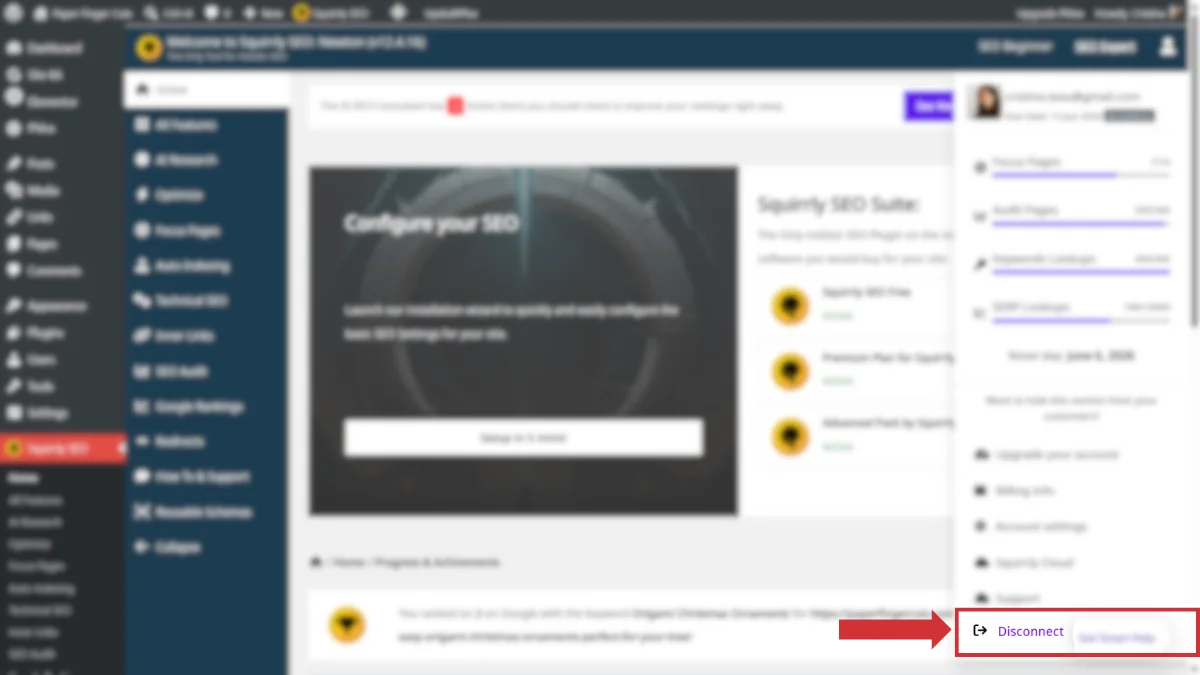
Step 3: Disconnect the current account
Click Disconnect at the bottom of the account menu. This disconnects your site from the currently connected Squirrly account and from the Squirrly Cloud. The menu item Squirrly > Home is now called First Step.
Step 4: Connect using the new account
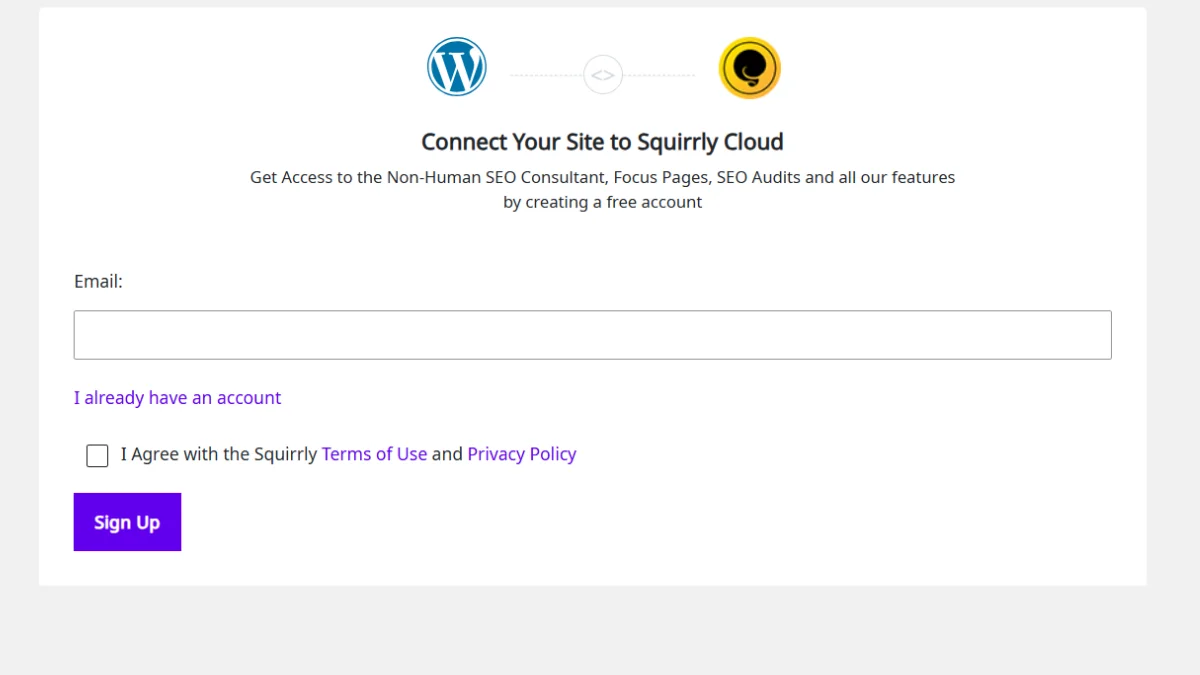
Go to Squirrly > First Step, the screen Connect Your Site to Squirrly Cloud. Then sign in with the correct email address (or the new account you want to use):
For an account you already have, click I already have an account, type the Email and Password, and click Login.
For a new account, type the email, tick I Agree with the Squirrly Terms of Use and Privacy Policy and click Sign Up.
You don’t need to change the account when you copy a site to staging, clone it or move it to a new address. WordPress shows a red notice and the screen This site needs to reconnect to Squirrly Cloud instead. Click Reconnect this site: Squirrly drops the old site keys and connects again with the same Squirrly login. After you move a site or change its address explains it.
How Can I Change the Main Keyword for a Focus Page?
One of the factors that the Focus Pages system takes into account when generating tasks and calculating a page’s chances of ranking is the MAIN keyword for which you’ve optimized that page using the SEO Live Assistant (SLA).
The SEO Live Assistant (SLA) allows you to optimize your content for multiple keywords, but you CAN’T have more than one keyword set as the main keyword for your Focus Pages at the same time.
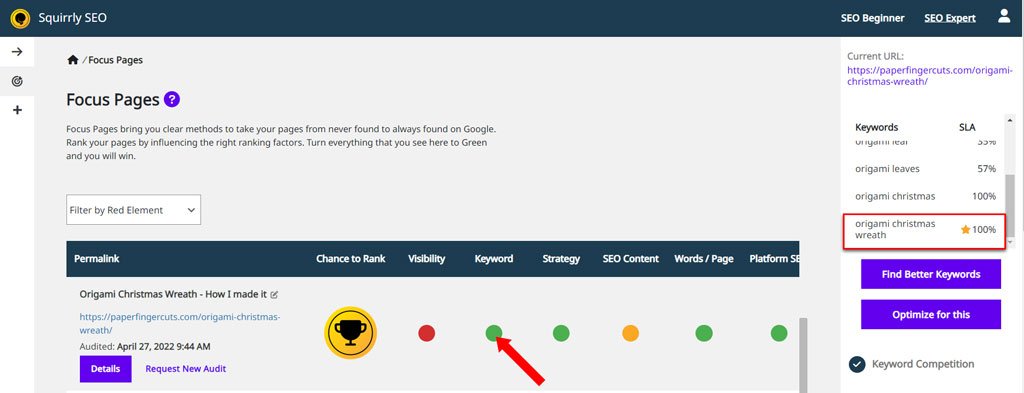
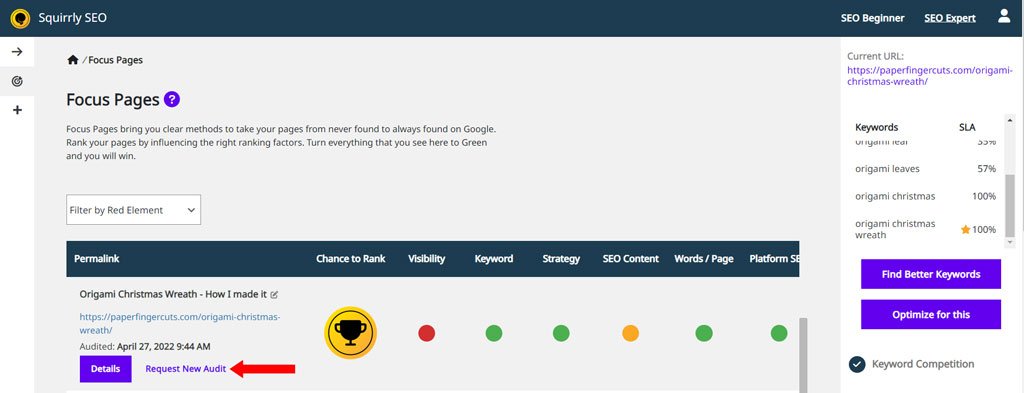
To indicate which keyword is currently set as your main keyword for a page you’ve added as a Focus Page – Squirrly will place a ★STAR SYMBOL next to it.
*as you can see in the screenshot below.
However, you can change the main keyword for your Focus Pages whenever you want – right from the Focus Pages section.
Here’s how to do it:
1️⃣ Go to Squirrly SEO > Focus Pages from your WordPress Dashboard.
2️⃣ Once inside the Focus Pages section, click on the Keyword Element corresponding to the Focus Page for which you want to change the main keyword.
Once you click on the Keyword Element:
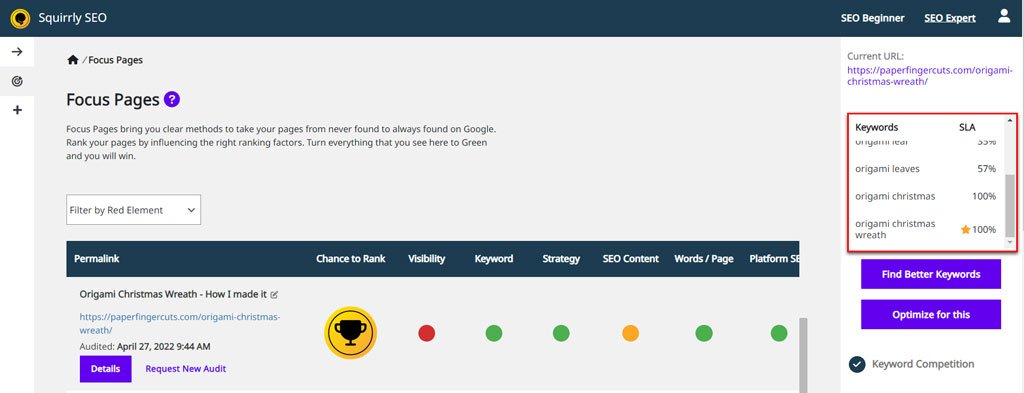
On the right side of the screen, you will see all the keywords for which you’ve optimized that Focus Page using the SLA, alongside the optimization percentage achieved for each keyword.
View an example of how this looks like in the screenshot below:
Again, the keyword that’s currently your main keyword associated with that Focus Page will have a ★STAR symbol next to it.
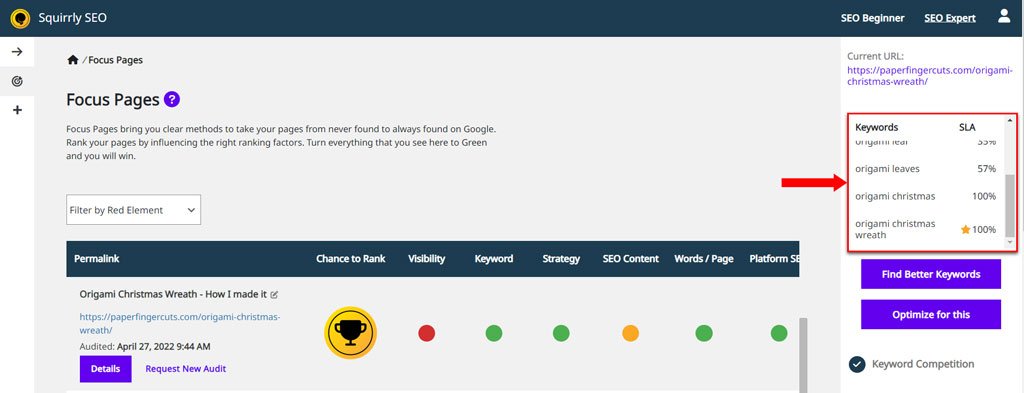
3️⃣ To change the main keyword for your Focus Page, click on the list of keywords located at the right side of the screen. (as shown in the screenshot below)
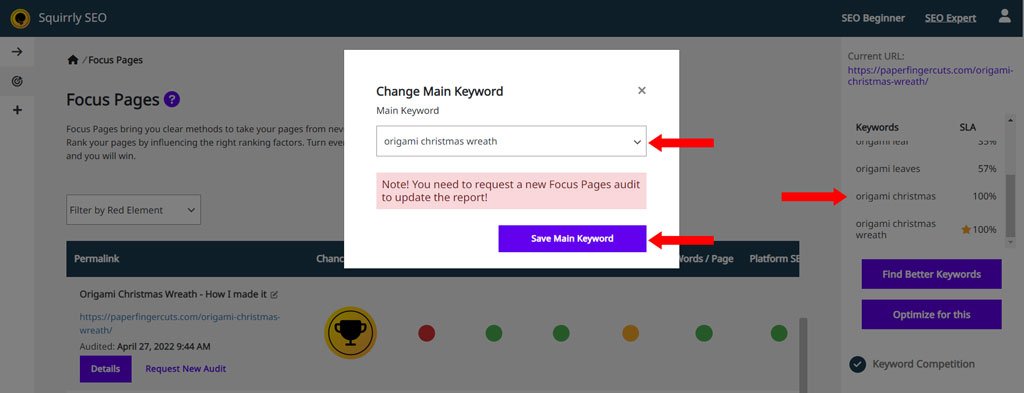
4️⃣ Clicking on the list of keywords will prompt a new panel to appear.
From the drop-down, select the keyword you want the Focus Pages system to recognize as the main keyword for your Focus Page. Click on Save Main Keyword to save your settings.
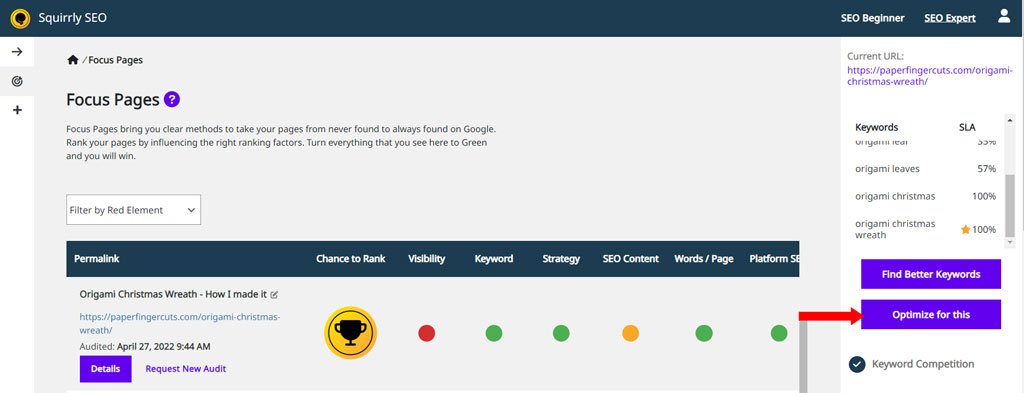
5️⃣ The final step is to Request a New Audit to update the report and receive fresh information.
Once you Request a New Audit, the Focus Pages system will start taking into account the new main keyword you’ve selected to calculate your chances of rankings and generate keyword-related tasks for your next report.
And your changes will be visible in the keywords list that appears on the right side of the screen when you click on the Keyword Element for your Focus Page (namely: the new keyword you’ve selected as the main keyword will have the ★ S T A R symbol next to it).
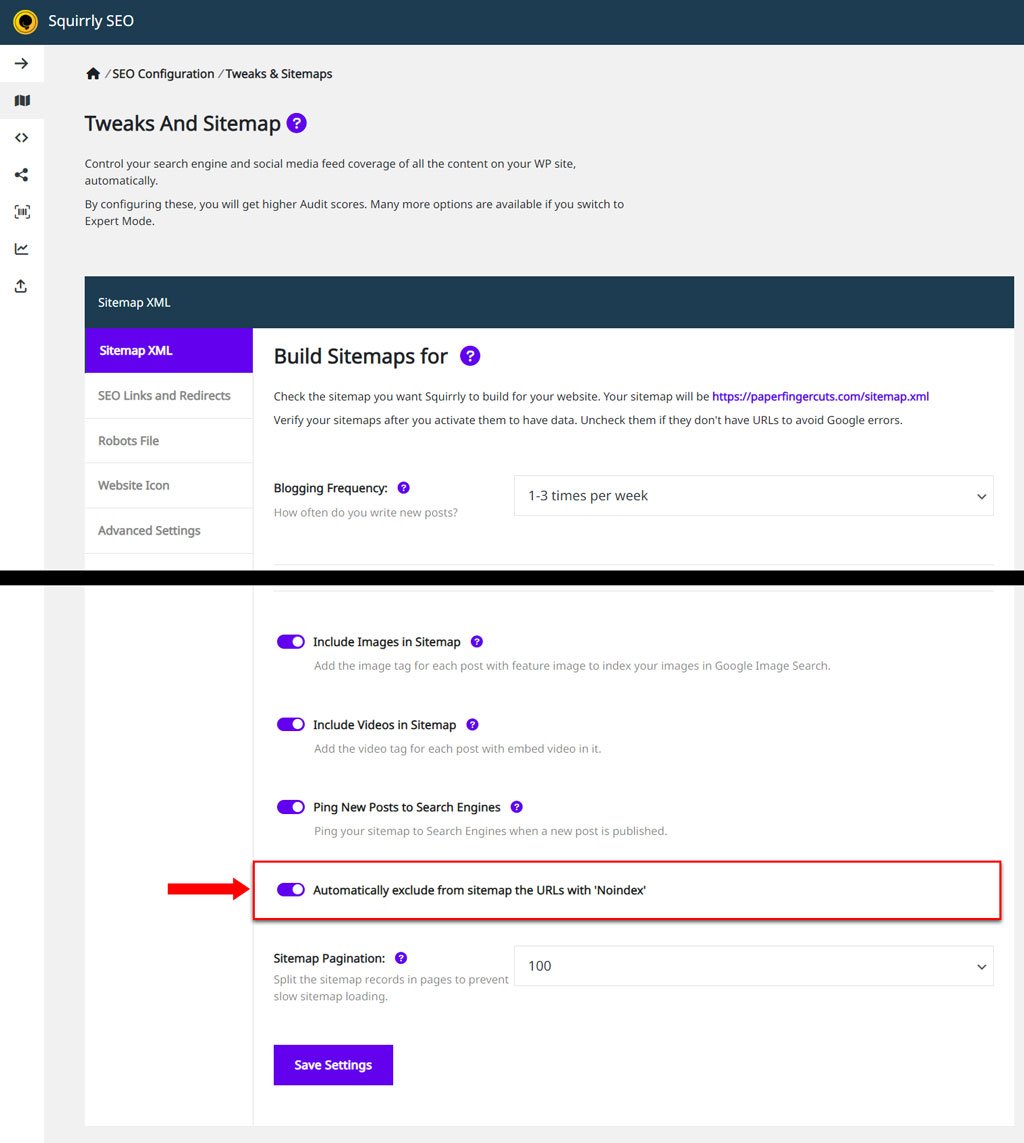
Note! If you want to further optimize your page (increase the optimization percentages or optimize for more keywords), you can click on Optimize for this.
Once you click on Optimize for this, Squirrly will take you to Edit Post where you can use the SEO Live Assistant to optimize for multiple keywords you previously saved to Briefcase.
Now You Know
By selecting the main keyword for your Focus Page – you’re basically telling our Focus Pages system:
This is the keyword I want you to take into account when calculating my Focus Page’s chances of ranking and configuring to-dos because this is the main keyword I’m interested in ranking for with this Focus Page.
And now you know how to do it – right from the Focus Pages section of Squirrly SEO.
Important Notes!
Squirrly will sync the information related to which is a page’s main keyword.
Meaning:
If you change the main keyword inside the SEO Live Assistant for a page you’ve added as a Focus Page, our Focus Pages system will consider that keyword to be the main keyword when calculating the chances of ranking and generating tasks.
And vice-versa. Changing the main keyword for your Focus Page from the Focus Pages section will also change the main keyword inside the SEO Live Assistant.
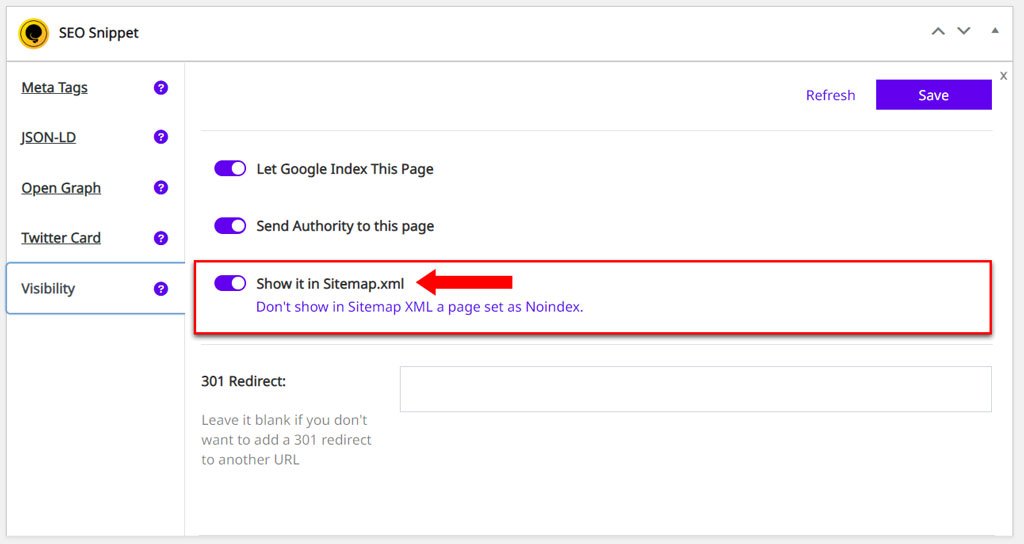
Is there a Way to Remove the no-index Pages from the Sitemap using Squirrly?
Q: Is there a way to remove the no-index pages from the sitemap? I get the following recommendation: Pages with the no-index meta tag have been found in the XML sitemap. This is confusing for search engines since sitemaps should only list pages that have to be crawled and indexed.
A: Yes, you can use Squirrly SEO to remove the no-index pages from the sitemap.
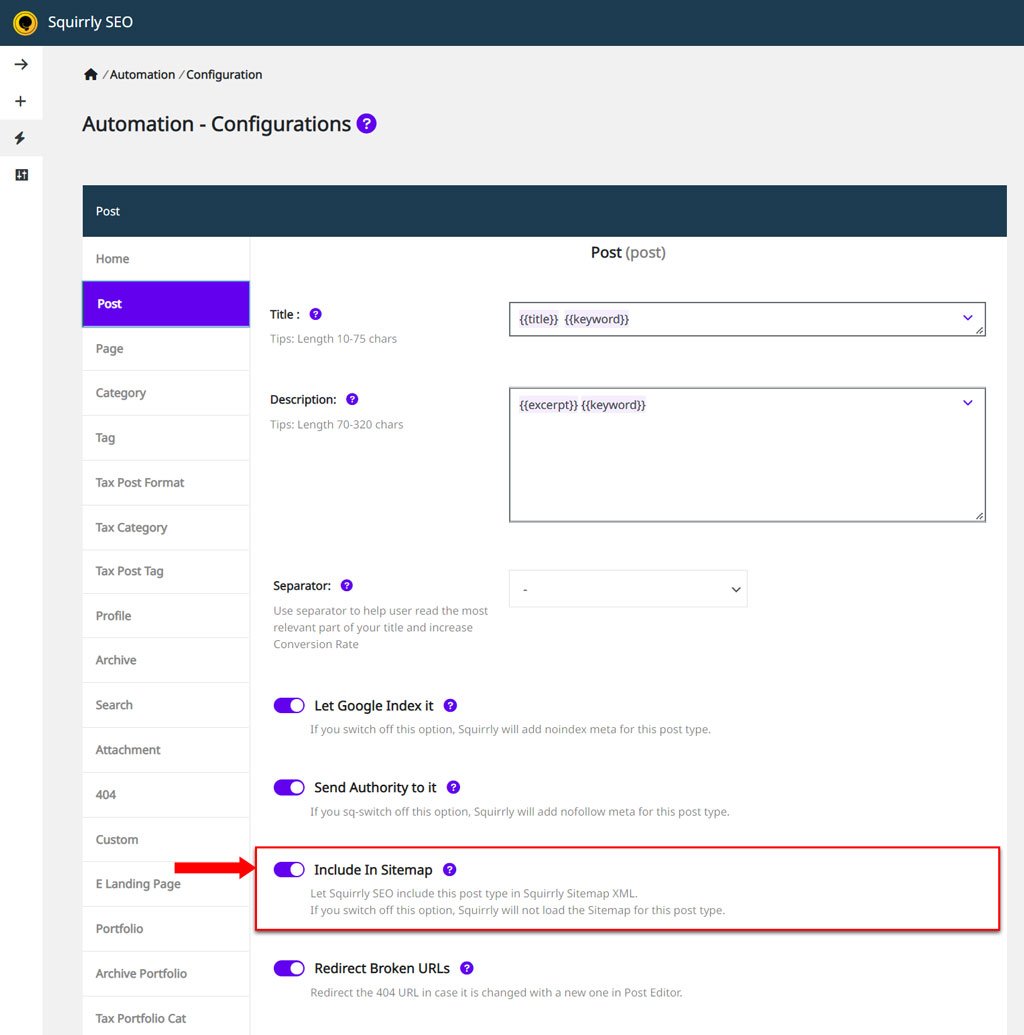
The easiest way is to go to Squirrly > Technical SEO > Tweaks & Sitemaps > Sitemap XML and turn on the option Automatically Exclude URLs With ‘Noindex’. Then click Save Settings.
The option shows in the SEO Expert view. It’s on by default when you set up the plugin in SEO Recommended Mode or SEO Expert Mode.
You can also do this by post type in Squirrly > Optimize > Automation > Configuration. Select the post type and switch off Include In Sitemap.