Author archives and tag pages each have a tab in Squirrly > Optimize > Automation, where Let Google Index it sets index or noindex for all pages of that kind.
Page
Tab in Automation – Configurations
Author archive, the list of one author’s posts
Profile
Tag archive, the list of posts with one tag
Tag
Go to Squirrly > Optimize > Automation.
Click Profile or Tag in Automation – Configurations.
Switch Let Google Index it off for noindex, or on to let Google index the pages.
Click Save Settings.
The switch shows only while Add Robots Meta is on in SEO Metas. On the Tag tab, Include In Sitemap also decides whether tag pages go in the sitemap. The Profile tab has no sitemap switch. On the demo store both tabs let Google index the pages.
How Can I Avoid URL Conflicts in WordPress When Managing Pages and Categories?
WordPress organizes and retrieves content based on URL structures. These URLs are crucial for categorization, navigation, and, importantly, SEO optimization.
Mismanagement of these URLs can lead to conflicts and hinder user experience and search engine indexing.
Understanding the Issue
In WordPress, different content types (like product pages, categories, and product categories) are typically accessed via distinct URL paths.
However, if these paths are not managed carefully, URL conflicts can occur, especially after making changes to the URL structure.
Example of a Common URL Conflict
Consider the following scenario:
Before Change:
/name – a page
category/name – a category (here, ‘category’ is a prefix indicating that the URL points to a specific category page).
product_category/name – a product category (in this case, ‘product_category’ is a prefix that shows this URL is associated with a particular product category).
After Change:
/name – now intended to serve a page, a category, and a product category
In the above example, removing the category path (category/ or product_category/) that helps differentiate URLs leads to all three types of content being called through the same URL (/name).
In this case, WordPress will only load the first record associated with /name from its database, as you no longer have 3 distinct URLs.
So, instead of accessing three different content types through three unique URLs as originally intended, visitors will only be able to reach the first type that WordPress retrieves from the database.
This limits access to just one type of content under the single shared URL.
Consequences
User Experience: Users may not find the content they are looking for, leading to frustration and increased bounce rates.
SEO Impact: Search engines might index only one type of content under the URL, thereby ignoring others, which could dilute the SEO effectiveness of your site.
Solution: Unique Naming Convention
Ensure that products, categories, and product categories each have unique, different names.
This prevents overlap in URL paths and maintains clear navigation paths for both users and search engines.
How to Set up sitemap.xml on Apache Servers?
Squirrly SEO automatically generates your sitemap when you enable the XML Sitemap settings.
On some Apache servers, based on the server configuration, you may need to add server-level rewrites to correctly set up the sitemap.xml file.
For this purpose, we recommend setting the following rules for Squirrly SEO sitemap in .htaccess file. Add them above the # BEGIN WordPress block. Apache reads the rules from top to bottom, and the WordPress block ends the processing (the L flag) for addresses that aren’t real files, such as sitemap.xml.
The last rule covers the other files: sitemap-home.xml, sitemap-product.xml, sitemap-news.xml and sitemap-attachment.xml.
The QSA flag keeps the paginated sitemaps working. The sitemap index links to addresses such as sitemap-posts.xml?page=2, sitemap-custom-posts.xml?type= followed by a post type name, or sitemap-custom-taxonomies.xml?taxonomy= followed by a taxonomy name. A RewriteRule pattern never sees the query string, and without QSA the new sq_feed query replaces the original one, so page 2 would load page 1. With QSA, Apache adds the original page, type and taxonomy parameters after sq_feed.
If your WordPress permalinks are set to Plain, Squirrly uses addresses such as /?sq_feed=sitemap-post and you don’t need these rules.
After you save the .htaccess file, open https://example.com/sitemap.xml (with your own domain) and click a few of the sitemaps it lists, including sitemap-tags.xml and a page 2, to check that each one loads.
NOTE! In case you are not 100% sure where to add these rules, we recommend reaching out to your web host or server admin and asking for further assistance.
Still Need Help?
If you’ve added the rewrite rules in the correct file, and you still encounter issues, they are likely linked to other settings on your server. You can always reach out to our support team via one of the available channels whenever you need more assistance.
What Database Tables Does Squirrly SEO and Squirrly SEO Advanced Pack Create?
The Squirrly SEO plugin and the Squirrly SEO – Advanced Pack plugin (which is necessary for accessing various Squirrly features and is included at no additional cost) both create database tables on your WordPress site. Each table has its own job.
The database tables that Squirrly SEO creates are:
wp_qss: the SEO Snippet table. Squirrly SEO creates it when you install and activate the plugin, and it holds the SEO you set for each page in the SEO Snippet and in Bulk SEO & Snippet.
wp_qss_searches: the WooCommerce product searches made on your site. Squirrly SEO creates it on a WooCommerce site with the Sitemap XML on, once you turn on Include Product Searches In Sitemap (Squirrly > Technical SEO > Rich Snippets > WooCommerce, the same option as Automation > Search > Include In Sitemap) and the first visitor searches your products.
wp_qss_searches_visitors: one row per search and visitor, so each visitor counts once for a search. It’s created together with wp_qss_searches.
Database tables created by Squirrly SEO – Advanced Pack:
wp_qss_redirects: created when you install the Squirrly SEO – Advanced Pack plugin and the Redirects feature is on. It holds your redirect rules.
wp_qss_redirects_log: the log/monitor table for the Redirects feature. It’s created when Log Redirects or 404 Monitor is on, and the Advanced Pack deletes it when you turn both off.
wp_qss_jsonld: the custom schemas of the Rich Snippets features (Custom Rich Snippets and Reusable Schemas). The Advanced Pack creates it when you activate the plugin, or when you first open Rich Snippets.
The tables use your own WordPress table prefix. On most sites it’s wp_, but it can be different (it’s set in wp-config.php).
IMPORTANT! wp_qss and wp_qss_jsonld are created when you activate the plugins. The other tables are created only when the features above are in use.
Option to delete tables on uninstall
In Squirrly > Technical SEO > Tweaks & Sitemaps > Advanced Settings, there’s an option labeled “Delete Squirrly SEO Table on Uninstall“.
This option gives you control over the data. If you turn it on, Squirrly SEO permanently deletes its options and the wp_qss, wp_qss_searches and wp_qss_searches_visitors tables from the database when you uninstall it.
The Advanced Pack reads the same switch. Advanced Pack 2.5.12 deletes wp_qss_redirects, wp_qss_redirects_log and wp_qss_jsonld when you uninstall it with the switch on. Advanced Pack 2.5.11 and older versions leave these three tables in the database, so remove them in phpMyAdmin if you need a clean database.
Delete the Advanced Pack before you delete Squirrly SEO. The switch is saved in the Squirrly SEO options, and Squirrly SEO deletes those options when it’s uninstalled, so after that the Advanced Pack no longer sees the switch.
Only turn on this option when you are 100% sure you no longer want to use Squirrly SEO and need to permanently delete all data related to Squirrly SEO from your WordPress site. More about it in Advanced Settings.
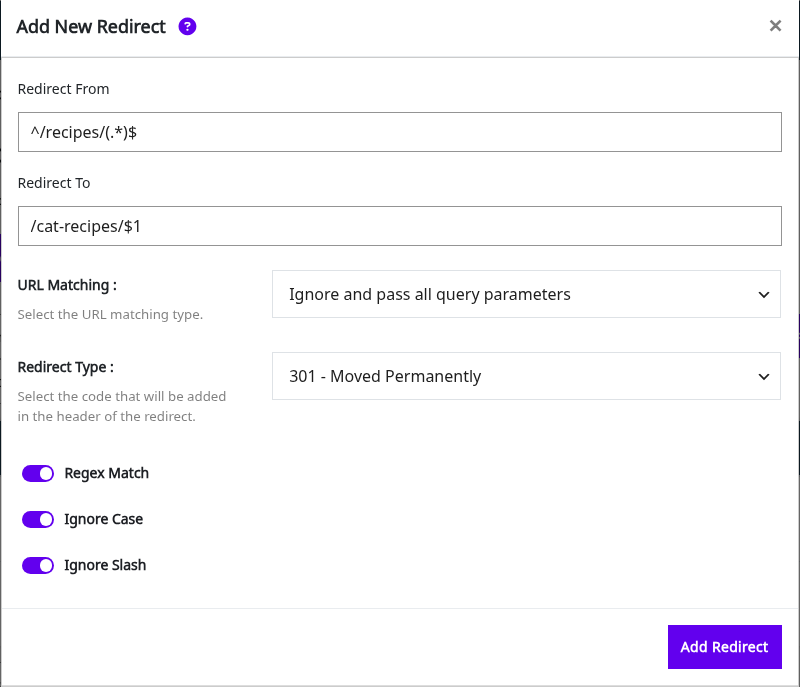
How To Use Redirects with Regular Expression & Regex?
A regular expression, often referred to as regex, is a set of characters used to identify patterns within a given piece of text. In the context of Squirrly > Redirects, a plain URL match corresponds to a single URL, while a regex URL can match multiple URLs. Squirrly > Redirects comes with the Squirrly SEO Advanced Pack (see Advanced Redirects Module).
Beyond just matching URLs, regular expressions in Squirrly > Redirects have the capability to extract information from the source URL and transfer it to the target URL. For instance, using the regex /my-url/.* will match requests for various URLs starting with “/my-url/,” allowing flexibility in redirection.
The .* in /my-url/.* is the regular expression part. It means “match /my-url/ followed by any sequence of characters.” To use regular expressions, turn on the Regex Match switch when you add the rule in Squirrly > Redirects > Rules. In SEO Beginner mode, click More Options first to see it. When you edit an existing rule, the same switch is called Regex Redirect Match.
Regular Expression Syntax: The .* in a regular expression like /my-url/.* is interpreted as “any character” (.), and the asterisk (*) means any number of the preceding expression. Regular expressions can become quite intricate, allowing for detailed and complex patterns.
Extracting Source Information: Regular expressions not only match multiple URLs but also extract information from the source URL for use in the target URL. For instance, using /oldpage/(.*) captures data within the brackets, allowing it to be reused in the target URL as $1.
Infinite Loops: A common challenge with regular expressions is the potential for infinite redirects. This occurs when a regex redirects to a URL caught by the same regex, creating a loop. To prevent this, using the ^ character at the start of the regex limits matches to the beginning of the URL.
Testing Regular Expressions: Various online tools, such as regexr.com and regex101.com, can help test and experiment with regular expressions. Keep in mind that Squirrly SEO uses PHP’s regular expressions (PCRE), which may differ slightly from other libraries.
Common Regular Expressions for WordPress: Below are some commonly used regular expressions for WordPress with Regex Match turned on:
Redirect date and name permalink:
Source: ^/\d{4}/\d{2}/\d{2}/(.*)
Target: /$1
Redirect date, name, and category permalink:
Source: ^/\d{4}/\d{2}/\d{2}/.*?/(.*)
Target: /$1
Redirect all URLs to /blog/ except those starting with /blog/:
Source: ^/(?!blog)(.*)
Target: /blog/$1
Redirect every page on the old site to the new site:
Source: /(.*)
Target: https://example.com/$1
Remove .html from Blogger pages:
Source: ^/(.*?).html$
Target: /$1/
What steps should I follow to ensure that Squirrly SEO can fetch values directly from wp_postmeta, if importing them via Excel?
What is wp_postmeta?
Every post contains an associated set of data, referred to as metadata, which is stored in the wp_postmeta table within your WordPress database.
Each entry in the wp_postmeta table is connected to a post and has a key-value pair, where the key is the name of the metadata element and the value is the metadata value.
Here’s a brief rundown of what each column in the wp_postmeta table represents:
meta_id: A unique identifier for each metadata entry.
post_id: The ID of the post this metadata is associated with.
meta_key: The name of the metadata element.
meta_value: The value of the metadata element.
In this setup, meta_key would be the name you give to a specific piece of information you’re storing about a post.
For instance, if you were storing the price of items as metadata, the meta_key might be “price”, and the meta_value would be the actual price of the item.
Now, if you want to import values from Excel, CSV, or another feed into wp_postmeta and want Squirrly SEO to be able to directly fetch the values from wp_postmeta, you just need to insert the following meta_key/value pairs in wp_postmeta:
_sq_description (string) = with the description from Squirrly SEO Snippet
_sq_keywords (string) = with the keywords from Squirrly SEO Snippet, separated by commas
Note! (string) indicates the data type of the metadata value you are setting. In programming, a string is a data type used to represent text rather than numbers. It signifies that the value for _sq_title, _sq_description, and _sq_keywords should be text.
That’s it! By adding/storing these meta_keys in wp_postmeta, Squirrly SEO will be able to retrieve the values directly from wp_postmeta for a particular post.
What’s the Difference between Review & AggregateRating Schemas and Other Schema Types?
With the release of version 2.2.9 of Squirrly SEO’s Advanced Pack, we introduced two new schema types that you can build using the Rich Snippets feature, namely:
“Review” Schema
“AggregateRating” Schema
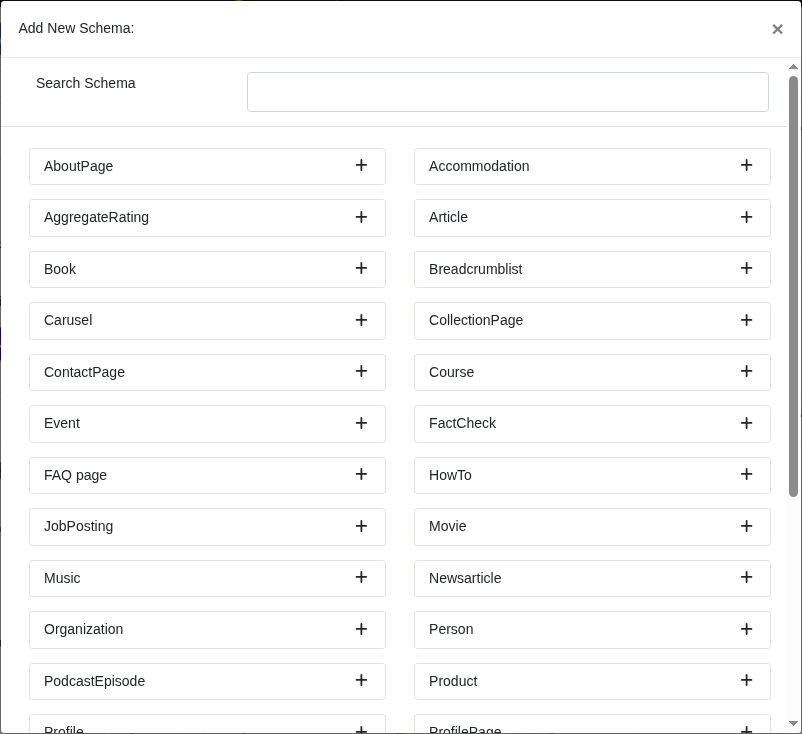
You build these schemas in the Rich Snippets tab of the Squirrly SEO Snippet: open it from Squirrly > Optimize > Bulk SEO (click any dot in a post row, then the Rich Snippets tab) or from the Squirrly SEO Snippet in the post editor. To build a schema once and use it on many pages, use Squirrly > Reusable Schemas (Advanced Pack).
In this short tutorial, we’ll focus on what these two new schema types help you achieve and how they are different from other schema types that you can build using Squirrly, such as “Book,” “Course,” “Event,” and more.
More about the Review and AggregateRating Schemas
These schema types are used to provide structured data about reviews and ratings for a specific item, such as a product or a service.
Review Schema. This schema type is designed to represent a short excerpt of a review or a rating of an individual item – for example, of a book, movie, recipe, or store.
AggregateRating Schema. This schema type is designed to represent the average rating of an item – for example, of a book, movie, recipe, or store – based on multiple ratings or reviews.
Nesting a Review into Another Schema Type
When using Squirrly’s Rich Snippets feature, you’ll notice that many of the different schema types come with an additional “Review” option.
This option allows you to combine multiple structured data by adding one or more reviews within the chosen schema type.
So, for example, if you select the “Product” schema, you can incorporate multiple reviews for that particular product as part of the “Product” schema type.
This process is called nesting and describes the addition of other structured data types within the main structured data.
Nesting a review into another schema type is a common practice to provide detailed information about an item and user feedback simultaneously.
Here’s an example of a review that’s nested in a “Product” schema type.
<html>
  <head>
    <title>The Catcher in the Rye</title>
    <script type="application/ld+json">
    {
      "@context": "https://schema.org/",
      "@type": "Product",
      "brand": {
        "@type": "Brand",
        "name": "Penguin Books"
      },
      "description": "The Catcher in the Rye is a classic coming-of-age story: an story of teenage alienation, capturing the human need for connection and the bewildering sense of loss as we leave childhood behind.",
      "sku": "9780241984758",
      "mpn": "925872",
      "image": "https://www.example.com/catcher-in-the-rye-book-cover.jpg",
      "name": "The Catcher in the Rye",
      "review": [{
        "@type": "Review",
        "reviewRating": {
          "@type": "Rating",
          "ratingValue": "5"
        },
        "author": {
          "@type": "Person",
          "name": "John Doe"
        }
       },
      {
        "@type": "Review",
        "reviewRating": {
          "@type": "Rating",
          "ratingValue": "1"
        },
        "author": {
          "@type": "Person",
          "name": "Jane Doe"
        }
      }],
      "aggregateRating": {
        "@type": "AggregateRating",
        "ratingValue": "88",
        "bestRating": "100",
        "ratingCount": "20"
      },
      "offers": {
        "@type": "Offer",
        "url": "https://example.com/offers/catcher-in-the-rye",
        "priceCurrency": "USD",
        "price": "5.99",
        "priceValidUntil": "2020-11-05",
        "itemCondition": "https://schema.org/UsedCondition",
        "availability": "https://schema.org/InStock",
        "seller": {
          "@type": "Organization",
          "name": "eBay"
        }
      }
    }
    </script>
  </head>
  <body>
  </body>
</html>
Similarly, for “Events,” “Courses,” “Movies,” “Books,” and others, you can include one or more reviews, and Squirrly will automatically generate the “AggregateRating” schema from those reviews.
Standalone or nested Review and AggregateRating
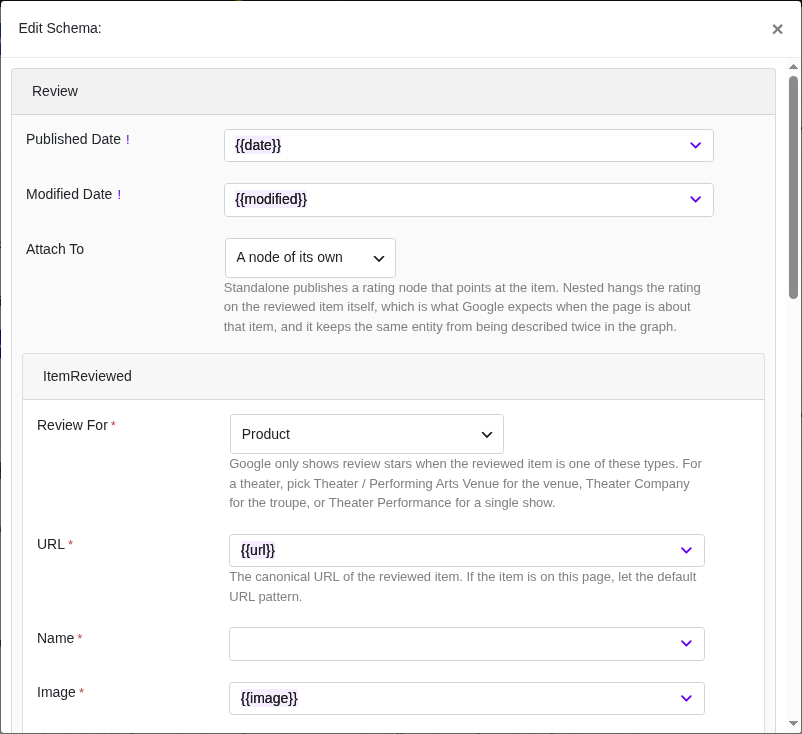
A Review or AggregateRating schema you build on its own has an Attach To option (an advanced field, Advanced Pack 2.5.12) with two choices:
Attach To
What Squirrly prints
A node of its own (Standalone, the default)
The rating as a separate node that points at the item through itemReviewed
The reviewed item (Nested)
The review or aggregateRating inside the reviewed item, with no separate node
The field help in the plugin says Nested “is what Google expects when the page is about that item, and it keeps the same entity from being described twice in the graph.” Every schema saved before this option existed uses Standalone.
Does Google Like You Adding One Structured Data inside another Type of Structured Data?
Here’s what Lizzi Sassman, tech writer at Google, had to say about this:
“Yep. Nesting your structure data can help us understand what the main focus of the page is. For example, if you put recipe and review at the same level, it’s not as clear as telling us that the page is a recipe with a nested review.
This means that the primary purpose of the page would be a recipe and that the review is a smaller component of that.”
Before we get into the solution, it’s important to understand what RSS feeds are and why they matter. RSS stands for “Really Simple Syndication.” It’s a technology that allows people to subscribe to a website’s content, so they can receive updates automatically. When you publish new content on your website, your RSS feed is updated automatically, and your subscribers receive a notification.
WordPress automatically generates RSS feeds for your website, including feeds for your categories. This means that your readers can subscribe to updates for a specific category of content, rather than receiving updates for all of your content. This is a useful feature because it allows readers to stay informed about the topics they care about most.
However, the downside of having category-specific RSS feeds is that Google sees those feeds as separate pages and warn you that the feed pages can’t be indexed.
How do you remove the WordPress feed on categories?
Squirrly SEO has no setting that turns off the WordPress feeds, so the solution is to add some code to your site. Put it in the functions.php file of a child theme, or in a code snippets plugin, so a theme update doesn’t remove it. Here’s the code you need to add:
This code creates a function called sq_no_category_rss_feed that runs when WordPress is about to show a feed (RDF, RSS, RSS2 or Atom). It compares the address with your main feed, /feed/. For any other feed, the function redirects the visitor to the same URL without the “/feed”. This removes the feed on categories and avoids the issue of Google Search Console showing these URLs as not indexed.
The code does more than remove the category feeds. It redirects every feed except the main /feed/ of the site: category and tag feeds, author feeds, custom post type feeds, the feed of each post’s comments and the comments feed of the whole site. For example, /category/news/feed/ goes to /category/news/. The redirect is temporary (HTTP 302), because wp_redirect() uses 302 when no status is given.
Once you have added this code to the functions.php file of your child theme, save the file and upload it back to your WordPress installation (in a code snippets plugin, save and activate the snippet). You should now be able to check your site in Google Search Console and see that the feed URLs on categories are no longer showing up as not indexed.
Removing the WordPress feed on categories is not ideal for all websites. If your site has a lot of content, and you cover a wide range of topics, then having category-specific RSS feeds can be very useful for your readers. In this case, you may want to leave the feeds as they are.
Did you get a 403 Forbidden error when you tried to open the IndexNow key location?
It can be fixed.
Below you’ll find:
what might cause the 403 Forbidden error;
what you can do about it so you can index your website with IndexNow.
In Squirrly SEO, IndexNow is part of LLM Indexing (Squirrly > LLM Indexing).
403 Forbidden error when trying to access IndexNow: possible reasons
The 403 Forbidden error has several possible causes, but the most common is that the API key file wasn’t generated automatically. This can come from a plugin conflict.
The site can also block the key file: HTTP authentication, a coming-soon or maintenance mode, a security or firewall plugin, or a CDN bot rule. Squirrly checks the key file for you in Squirrly > LLM Indexing > Settings. When it can read the file, it shows “Your IndexNow key file is publicly accessible, so search engines can verify your submissions.” When it can’t, it shows “Your IndexNow key file is being blocked.”
Here’s how to fix the 403 Forbidden error with IndexNow.
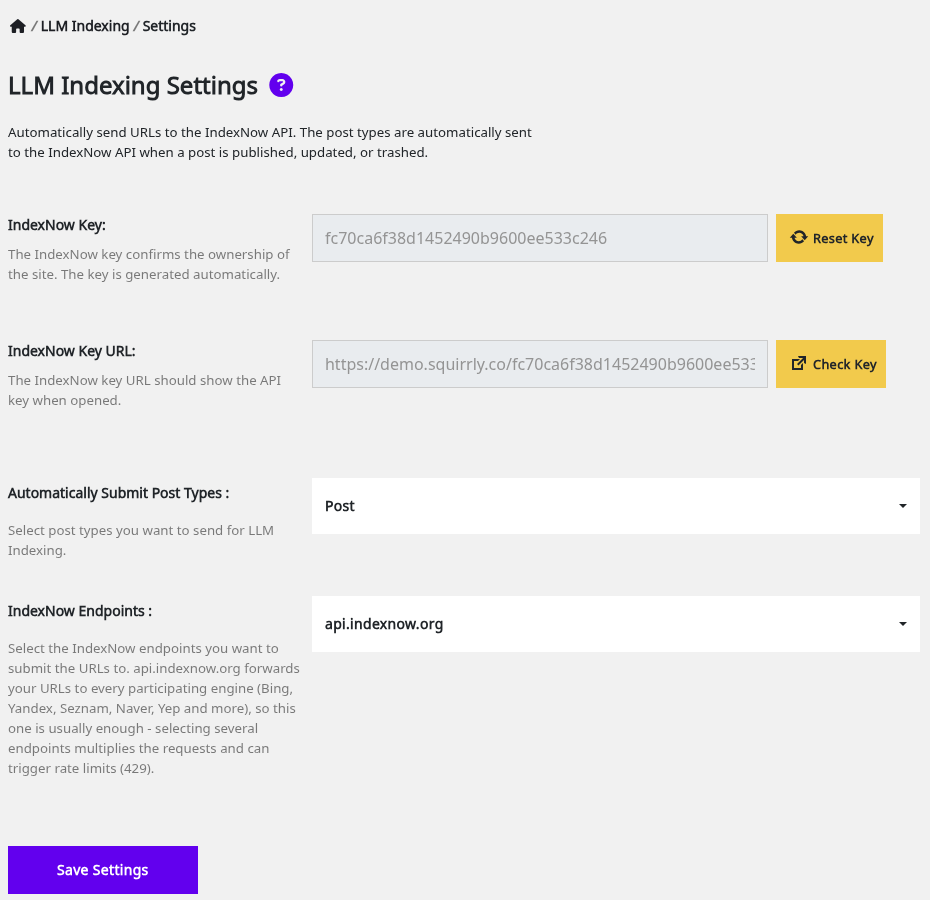
Fix the 403 Forbidden error by changing the API key in Squirrly SEO
To submit URLs to the IndexNow API, you must “prove” that you own the site the URLs belong to. This requires an API key. Squirrly generates an API key for your website automatically and serves it from your website, at yoursite.com/[your_api_key].txt.
Once generated, the API key shows in the IndexNow Key field.
To change the API key in Squirrly SEO:
Go to Squirrly > LLM Indexing > Settings > IndexNow Key. Then click the “Reset Key” button shown below. Squirrly generates a new API key for your site right away.
When this step is done, clear the cache and make sure your API key is accessible to search engines. For this:
Go to Squirrly > LLM Indexing > Settings > IndexNow Key URL.
Click the “Check Key” button shown in the screenshot below.
The Check Key button opens the key URL in a new tab.
If the new tab shows your API key and nothing else, you’re all set!
Search engines can then read the API key to verify ownership (as long as access to this URL isn’t blocked in robots.txt).
What if changing the API key in Squirrly SEO doesn’t work?
If changing the API key in Squirrly doesn’t work for you, there’s another quick way to fix the 403 Forbidden error.
The solution is to manually add the text file with the API key to the root of your website. Here’s how:
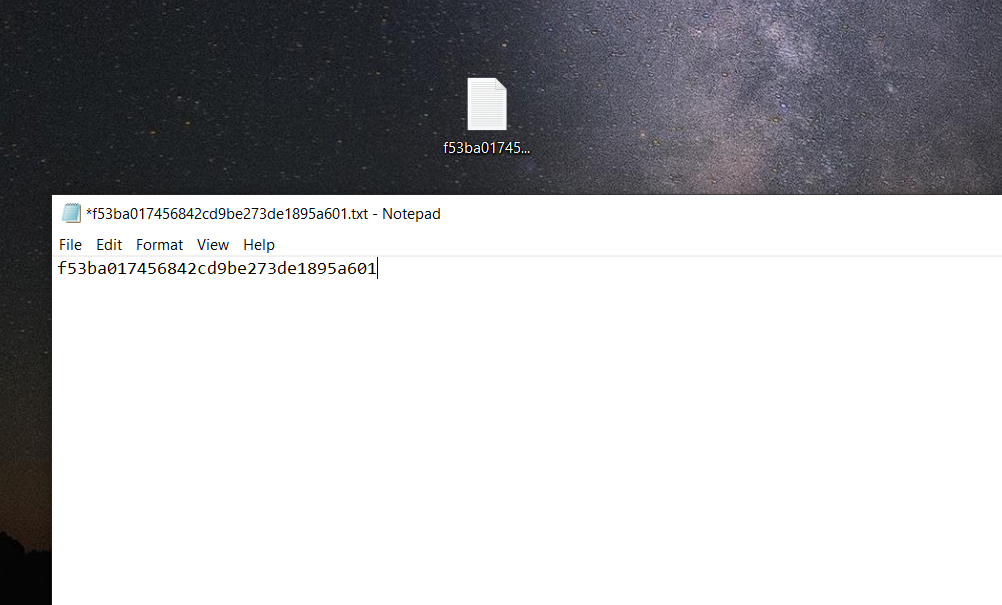
1. Create a text file. Name it [your_api_key].txt. The file name must contain your API key.
2. Next, add the API key to the text file. DO NOT include anything else in the file, such as extra characters, symbols or spaces.
3. Finally, upload the text file to the root of your website. You can use an FTP client or cPanel’s File Manager.
To log in to a server with FTP, you first need:
the FTP credentials (username and password),
the address of the FTP server,
and the document root directory.
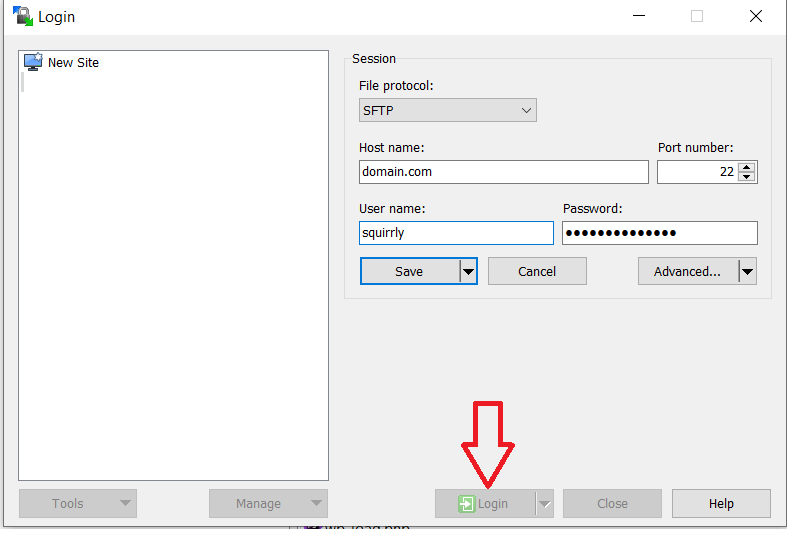
With this information, you can connect to your server with an FTP client such as WinSCP (download WinSCP for free here).
Check that all the information is entered correctly. Then press the “Login” button to connect to your server.
Then upload the text file that contains your API key. To do this:
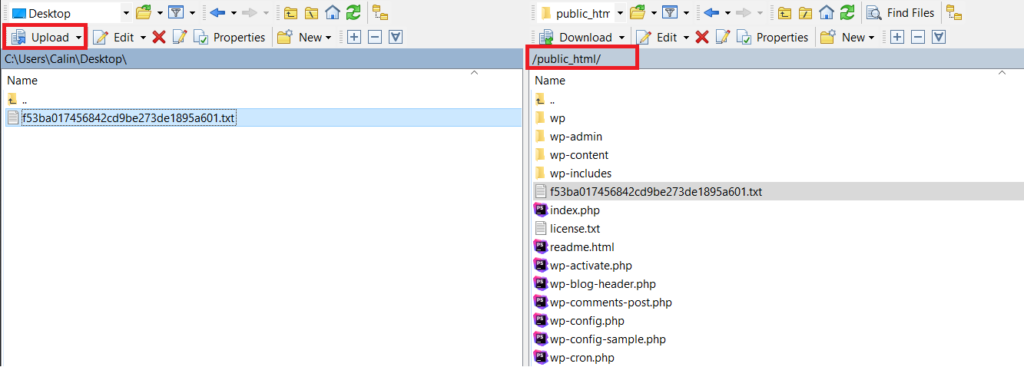
open the local folder on your computer where you saved the text file with the API key;
open the remote site folder (the folder on your server where your site is). Usually it’s the “public_html” folder.
With both the local and the remote folders open, select the text file and click the Upload button.
The file starts uploading right away. Once you see it in the remote site folder, you’re done.
After these steps, the IndexNow API key opens from its location and search engines can read the key file to verify site ownership.
Check that your URLs are sent to the IndexNow API in LLM Indexing History
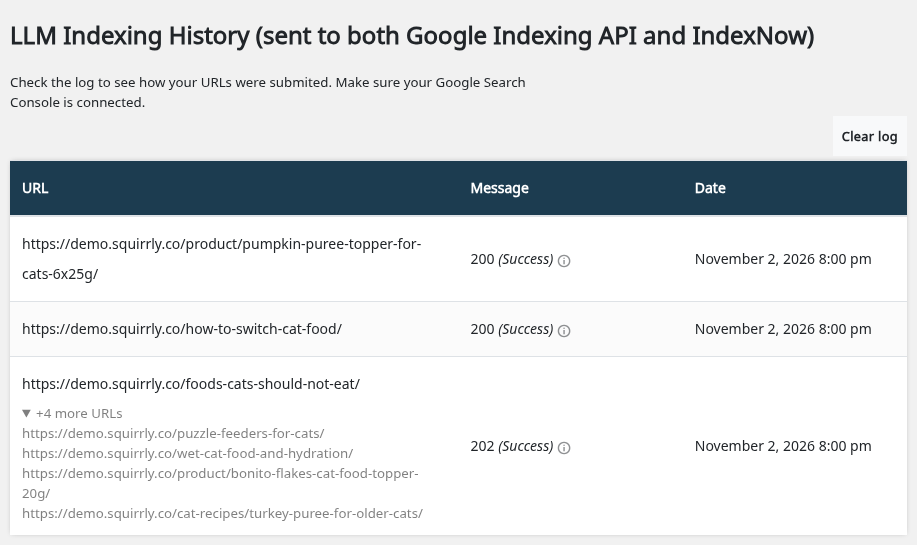
To open the history, go to Squirrly > LLM Indexing > Submit URLs. The list is called LLM Indexing History (sent to both Google Indexing API and IndexNow).
There you can check that your URLs are sent to the IndexNow API so they can be indexed quickly.
The history shows a list of the most recent URLs submitted to the IndexNow API, with the response code and the message for each submission. In Submit URLs you can send up to 10,000 URLs at once, one per line.
Here is the full list of response codes and what each one means:
HTTP CODE
MESSAGE IN SQUIRRLY
DESCRIPTION
200, 202, 204
Success
The IndexNow API accepted your URLs. With 202, it still needs to validate the API key to confirm the URLs belong to your site.
400
Invalid request.
The URL was not properly formatted. Check that every line is a full URL of this site.
401
Unauthorized. Search engines could not read your IndexNow key file
Your site blocks the key file. Open the key file URL in a private window and remove what blocks it.
403
Forbidden. The IndexNow key could not be verified.
The IndexNow API did not find your API key and cannot confirm the URLs belong to your site. Follow the steps on this page.
404
The IndexNow key file was not found.
Click Check Key in Settings, then Reset Key if it fails.
422
Invalid URL or the key location does not match this host.
The URLs belong to another site, or the key file isn’t on this domain. Send only URLs of the domain the plugin runs on.
429
Too many requests.
The IndexNow API received too many requests. Squirrly retries on its own.
500, 503
Internal server error. / Service temporarily unavailable.
A problem on the IndexNow side. Squirrly retries on its own.
After a timeout, a 429 or a 5xx code, Squirrly schedules up to 3 retries, 5, 15 and 45 minutes apart. The message then ends with “retry 1 of 3 scheduled in 5 minutes”.
What Causes the Exclamation Mark in the Connected Websites dashboard of the Squirrly Cloud App?
In case you have multiple websites on which you use Squirrly SEO, you can easily add them to the list of Connected Websites in the Squirrly Cloud App (shown below) following the steps from this article.
In some instances, a domain that has been connected to the Squirrly Cloud can get an exclamation mark in the Connected Websites dashboard of the Squirrly Cloud App.
Keep reading to learn more about what causes this and what to do in case this happens to you.
What Causes an Added Domain to Get Exclamation Mark inside the Cloud App?
This issue is linked to the fact that the connection of a site to the Squirrly Cloud App is done via token and NOT via URL. Therefore, when a user clones a WordPress site to another domain name, here is what happens:
User connects domain1.com to the Cloud App (cloud.squirrly.co)
domain1.com – Squirrly URL Token 1
User clones the existing WordPress site and moves it to a new domain name.
domain2.com – Squirrly URL Token1
When domain1.com gets changed to domain2.com in the Settings > General option in WordPress, the Cloud App will receive a different domain based on the same token, which leads to a matching error.
Squirrly URL Token1 – domain1.com or domain2.com ?
In this situation, Squirrly Cloud will alert you that the domain name is changed but the URL Token is not.
Solution:
If a site is cloned to another domain name, the new domain name will have the same URL Token as the site it was cloned from (domain1.com), and the URL Token needs to be changed in WordPress.
Squirrly SEO now finds most cloned, staged or moved sites by itself. In the WordPress dashboard of the cloned website, it shows a notice and the screen This site needs to reconnect to Squirrly Cloud, which says the site “was cloned, staged or moved to a new address”.
Click Reconnect this site on that screen, or the reconnect link in the notice.
Reload the screen you were on and check that the notice is gone.
If you changed your domain name from WordPress Settings > General and you want to update the data on Squirrly Cloud to match the domain, click on the Edit icon and then click on the Set WordPress Domain button.
This process will update the domain name on Squirrly Cloud for all Focus Pages, Optimization, Rankings, etc.
Before you leave
Future of AEO GEO and AI Search!
Free Now. Free Forever.
Trusted by 139,000+ students who've learned from AISQ Growth