Web Dev Kit: All Plugin Customization Options Explained
The Web Dev Kit lets an agency set up Squirrly SEO for its clients from Dev Kit Settings in the Squirrly Cloud account, download a customized plugin ZIP and install it on each client site. This guide lists every option on that screen and what the client sees after the install.
The Dev Kit panel lives in Squirrly Cloud, not in WordPress. Web Dev Kit in Squirrly Cloud covers the plans, the ZIP and the agency workflow. The Cloud screenshots come from a test account. The plugin screenshots come from demo.squirrly.co, a test store with Squirrly SEO 14.2.10 and the Advanced Pack 2.5.12, which runs without the Dev Kit.
What the Web Dev Kit changes
The Dev Kit values travel inside the ZIP. Once the plugin is active on the client site, they change five things.
| Part | What changes in WordPress |
|---|---|
| Plugin Logo URL | The logo in the WordPress menu, in the Squirrly header and in the Squirrly box of the post editor |
| Plugin Name | The name of the plugin on the Plugins screen |
| Plugin Menu Name | The word Squirrly in the WordPress menu, the admin bar and the plugin’s top bar |
| Menu Options | Which Squirrly menu items and Home blocks the client sees |
| Audit Option | Your own text on the passed and failed tasks of the GEO Audit |
Custom Settings and Limits & Packages change the settings the plugin starts with and the credits each site gets. Both are covered further down.
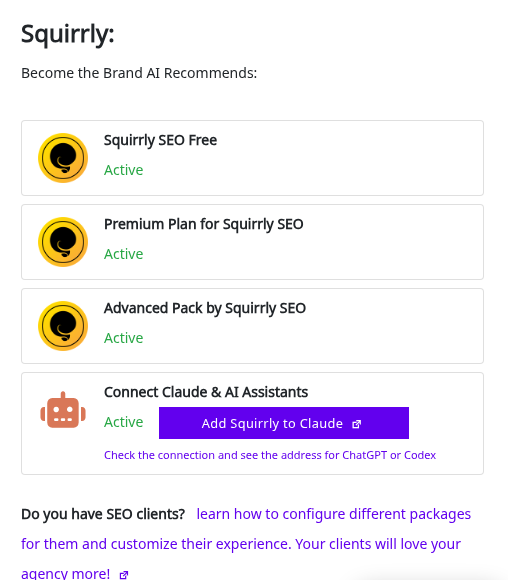
The Dev Kit has to be active on your Squirrly account. When it isn’t, the Home page of the plugin shows Do you have SEO clients? with a link to this guide.
How it works
- In your Squirrly Cloud account, click Dev Kit Settings.
- Go through the tabs of the panel and set the options for this client.
- Click Save DevKit Options.
- Open the Download tab and click Download to save the ZIP file.
- On the client site, go to Plugins > Add New Plugin, click Upload Plugin, choose the ZIP and click Install Now.
- Click Activate Plugin.
The ZIP carries a package.json file with the settings you chose and your account’s API token. On the first load the plugin copies those settings into its own options, deletes the file and connects the site to your account, with no login. Later updates come through Update Now on the Plugins screen, like any plugin.
Treat the ZIP like a password, since it connects any site to your account. The Cloud keeps only the last saved options, so download each client’s ZIP before you change them for the next one.
On a site that’s already connected, the ZIP applies on the next page load and its settings are written over the ones the plugin finds. The site stays on the account it’s connected to, because the plugin ignores the token in that case. Using the Web Dev Kit on a Website where Squirrly SEO is Already Installed has the steps to move such a site to your account.
The customization panel
The screen is called Customize & Download Squirrly SEO Plugin. Its left column has DevKit, with the first five tabs below, and Limits & Packages.
| Tab in Dev Kit Settings | What you set |
|---|---|
| Name & Logo | Plugin Logo URL, Plugin Name, Plugin Menu Name |
| Menu Options | 18 Show switches for the menu items |
| Custom Settings | 25 switches for the settings the plugin starts with |
| Audit Option | Your text for success and fail tasks |
| Download | The customized plugin ZIP |
| Limits & Packages | Credit limits per connected site |
A switch slid to the right is on, and to the left is off.
Name and logo
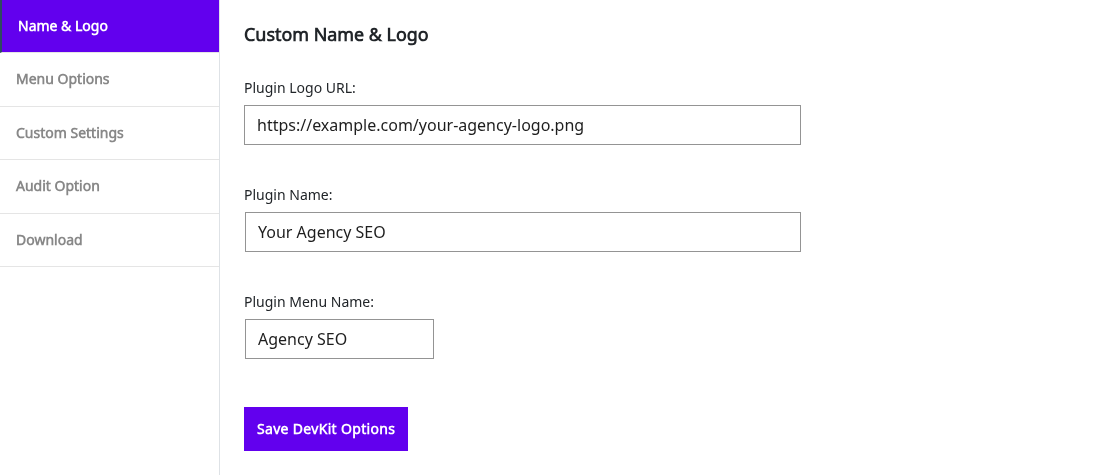
The Name & Logo tab is titled Custom Name & Logo.
Plugin Logo URL
Paste the address of an image in Plugin Logo URL:. The plugin uses it as the icon of the Squirrly item in the WordPress menu, the logo in the Squirrly header and the icon of the Squirrly box in the post editor. The Cloud copies the image into the ZIP at download, so the address doesn’t have to stay online. Use a square image of 200 by 200 pixels.
Plugin Name
The name you type in Plugin Name: replaces the plugin name on the client’s Plugins screen. The plugin has to be active for the change to show.
Plugin Menu Name
Plugin Menu Name: replaces the word Squirrly in the WordPress left menu, in the admin bar at the top of the screen and in the plugin’s own top bar.
The logo and the menu name apply once the plugin on the client site is connected to your Squirrly Cloud account, which the ZIP does by itself. The plugin name on the Plugins screen applies right after activation.
Menu options
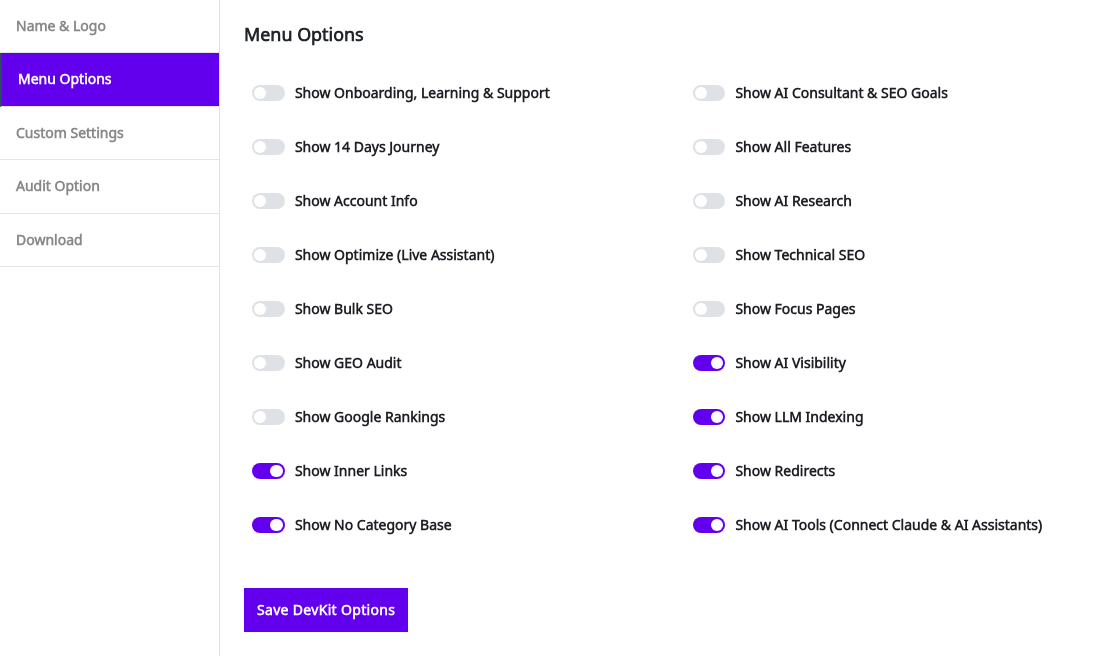
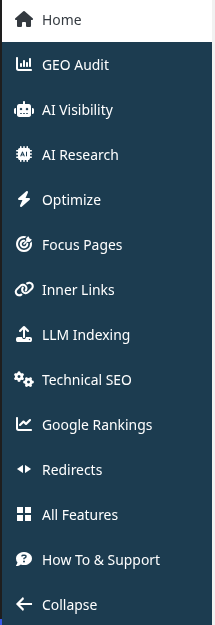
Each of the 18 switches on the Menu Options tab hides one Squirrly menu item, or one block on Home, on the client site. All of them start on, and with every switch on the client sees the full menu.
Hidden items keep working
A switch only hides the menu item and its link. The feature keeps running, and a hidden screen such as AI Research still opens from a direct link to its address.
Show Onboarding, Learning & Support
Off hides the Onboarding item, the How To & Support item, the Learning tabs and the Free Learning Materials blocks at the bottom of the Squirrly screens.
Show AI Consultant & SEO Goals
Off hides AI Consultant in the admin bar menu, removes the red count of action items from the Squirrly menu and hides the Progress & Achievements block on Home.
Show 14 Days Journey
Off hides the 14 Days Journey block on Home and the journey card in All Features.
Show All Features
Off hides the All Features menu item and the Main Features block on Home.
Show Account Info
Off hides the Account Info item, the account block with the plan and the limits, and the Squirrly Cloud App card in All Features. Your email and plan stay out of the client’s view. The plan details FAQ covers the same switch.
Show AI Research
Off hides AI Research, the menu with Find Keywords, the Briefcase, Labels, Suggested and History.
Show Optimize (Live Assistant)
Off hides Optimize, the menu of the Live Assistant settings, and the Copyright Free Images card that the Advanced Pack adds to All Features.
Show Technical SEO
Off hides Technical SEO and its tabs, including Connect Tools and Import & Data, and the SEO Beginner and SEO Expert buttons in the Squirrly header.
Show Bulk SEO
Off hides the Bulk SEO tab under Optimize and its card in All Features.
Show Focus Pages
Off hides Focus Pages.
Show GEO Audit
Off hides GEO Audit and AI Visibility together.
Show AI Visibility
Off hides AI Visibility alone, the menu item and its box in the GEO Audit, and leaves the GEO Audit visible.
Show Google Rankings
Off hides Google Rankings.
Show LLM Indexing
Off hides the LLM Indexing menu item. The item also needs Load IndexNow on.
Show Inner Links
Off hides the Inner Links menu item. The item also needs Load InnerLinks on Focus Pages on.
Show Redirects
Off hides the Redirects menu item. The item also needs Activate Redirects on, and that switch starts off.
Show No Category Base
Off hides the No Categories tab and its card.
Show AI Tools (Connect Claude & AI Assistants)
Off hides the AI Tools tab of Technical SEO > Connect Tools and the Connect Claude & AI Assistants card in All Features.
Items without a switch
Two parts of the plugin have no switch on the Menu Options tab, so they stay visible on client sites.
| Menu item | Note |
|---|---|
| Automation | The tab under Optimize can’t be hidden |
| Reusable Schemas | The Advanced Pack menu item stays at its default, on |
Switches that are gone
The switches for One Page Setup, Automation and Squirrly Ads are no longer on the page, because the plugin doesn’t read them.
Panel link to cloud.squirrly.co
This switch is gone too. To keep the Cloud out of the client’s view, use Show Account Info.
Custom settings
The 25 switches on the Custom Settings tab set the features that are on when the client site starts. The values travel in the ZIP, and the plugin copies them into its settings on the first load. After that the client can change them in the plugin like any setting.
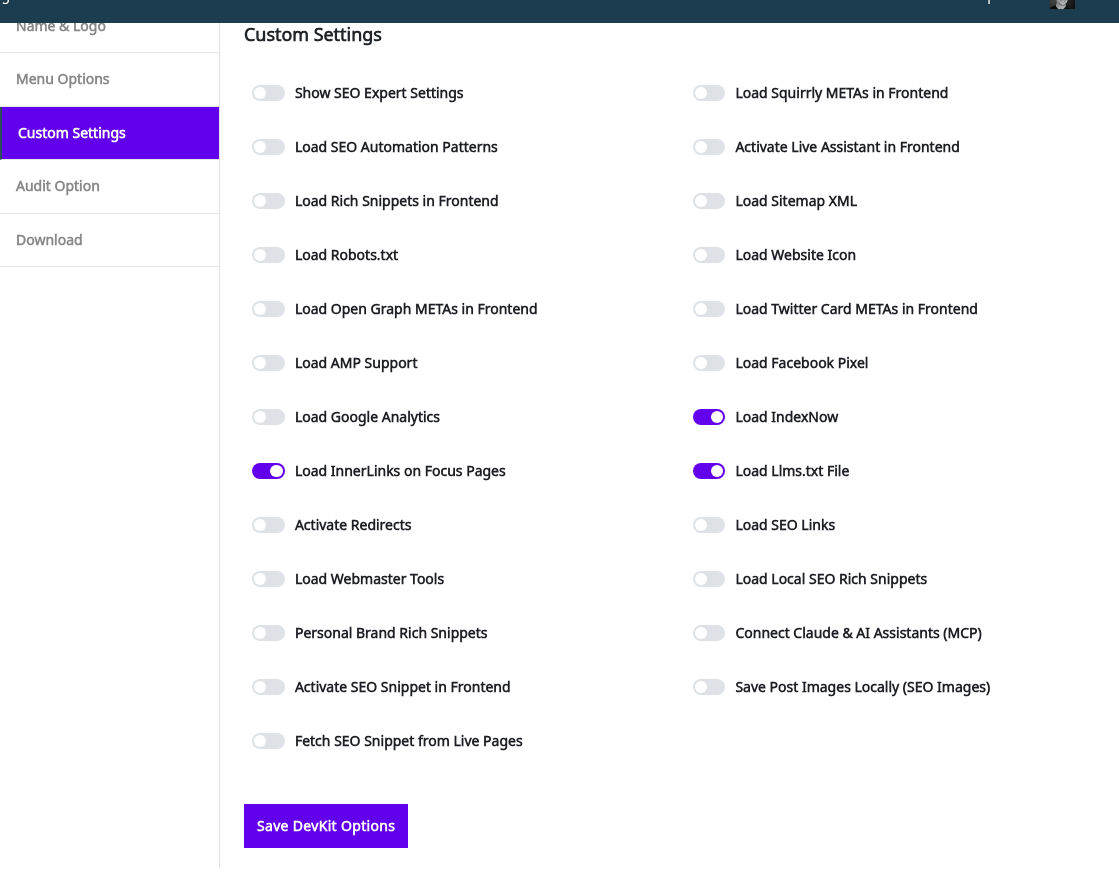
Show SEO Expert Settings
Off by default. On starts the plugin in SEO Expert mode instead of SEO Beginner, which adds tabs such as Advanced Settings, the last tab of Squirrly > Technical SEO > Tweaks & Sitemaps.
Load Squirrly METAs in Frontend
On by default. Turns on the SEO Metas, checked later at Squirrly > Technical SEO > SEO Metas.
Load SEO Automation Patterns
On by default. Turns on the patterns of Automation, under Squirrly > Optimize > Automation.
Activate Live Assistant in Frontend
On by default. Turns on Activate Live Assistant in Frontend at Squirrly > Optimize > Settings, which the screen describes as loading the Live Assistant in the front end for pages built with builders.
Load Rich Snippets in Frontend
On by default. Turns on the JSON-LD Structured Data in the source code of the pages.
Load Sitemap XML
On by default. Turns on the Squirrly sitemap, set at Squirrly > Technical SEO > Tweaks & Sitemaps.
Load Robots.txt
On by default. Turns on the Squirrly robots.txt, on the Robots File tab of the same screen.
Load Website Icon
On by default. Turns on the Website Icon tab settings.
Load Open Graph METAs in Frontend
On by default. Turns on the Open Graph tags set at Squirrly > Technical SEO > Social Media.
Load Twitter Card METAs in Frontend
On by default. Turns on the Twitter Card tags on the same screen.
Load AMP Support
On by default. Turns on Load the AMP Support on AMP pages in Connect Tools, which loads the AMP versions of Google Analytics and the Facebook Pixel.
Load Facebook Pixel
On by default. Turns on Facebook Pixel Tracking. The client still needs a Pixel ID in Place Trackers.
Load Google Analytics
On by default. Turns on Google Analytics Tracking. The Analytics ID goes in Place Trackers.
Load IndexNow
On by default. Turns on IndexNow, and the LLM Indexing menu item needs it.
Load InnerLinks on Focus Pages
On by default. Turns on Use Inner Links Assistant, the Inner Links setting of Focus Pages.
Load Llms.txt File
On by default. Turns on the llms.txt file.
Activate Redirects
Off by default. Turns on Redirects, and the Redirects menu item needs it.
Load SEO Links
Off by default. Turns on SEO Links.
Load Webmaster Tools
Off by default. Turns on the Webmaster Extras tab of Connect Tools.
Load Local SEO Rich Snippets
Off by default. Turns on the Local SEO rich snippets.
Personal Brand Rich Snippets
Off by default. Turns on Personal Brand Rich Snippets, the option for personal websites.
Connect Claude & AI Assistants (MCP)
Off by default. Turns on Allow AI assistants to connect with a sign-in in the AI Tools tab of Connect Tools. Connect Squirrly to AI Assistants has the steps.
Activate SEO Snippet in Frontend
Off by default. Turns on Load SEO Snippet in Frontend, which the screen describes as a way to customize the SEO directly from the page preview.
Save Post Images Locally (SEO Images)
Off by default. Turns on Download Remote Images at Squirrly > Optimize > Settings, which downloads remote images to the Media Library for new posts.
Fetch SEO Snippet from Live Pages
Off by default. Turns on Fetch Snippet on Social Media at Squirrly > Optimize > Settings, which fetches the snippet on the Facebook Sharing Debugger every time the content of a page changes.
Audit option
The two fields of the Audit Option tab put your own text into the tasks of Squirrly > GEO Audit on every client site. Both accept HTML, so a link or an image works. The allowed tags are a, img, br, p, em, b, strong and h2 to h6, and the ul, ol and li tags aren’t on that list.
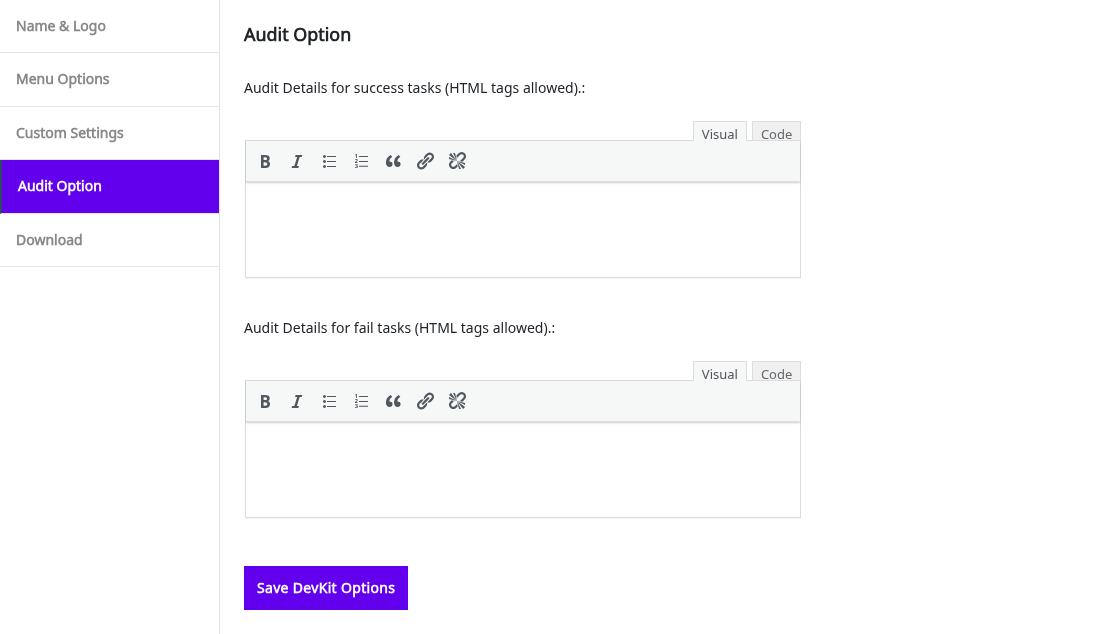
Audit Details for success tasks (HTML tags allowed).
Your text replaces the description of every passed task, the ones with the green thumbs up and the Details link. Saving it also removes the Pro Tip from those tasks.
Audit Details for fail tasks (HTML tags allowed).
Your text replaces the description of every failed task, the ones with the red thumbs down and How to fix this. Saving it also removes the Pro Tip from those tasks. A line such as “Need help with this? Write to us” with your contact link sits right next to each problem.
Both texts also show on your own GEO Audit in the Cloud. This tab is the only audit customization in Dev Kit Settings.
Limits and packages
In Dev Kit Settings > Limits & Packages you click Add Package and create packages with a Package Name and limits for Keyword Researches / website / mo, Focus Pages / website, Audit Pages / website and SERP Credits / website / mo. Set Default DevKit Package to Yes on one package, for sites without their own.
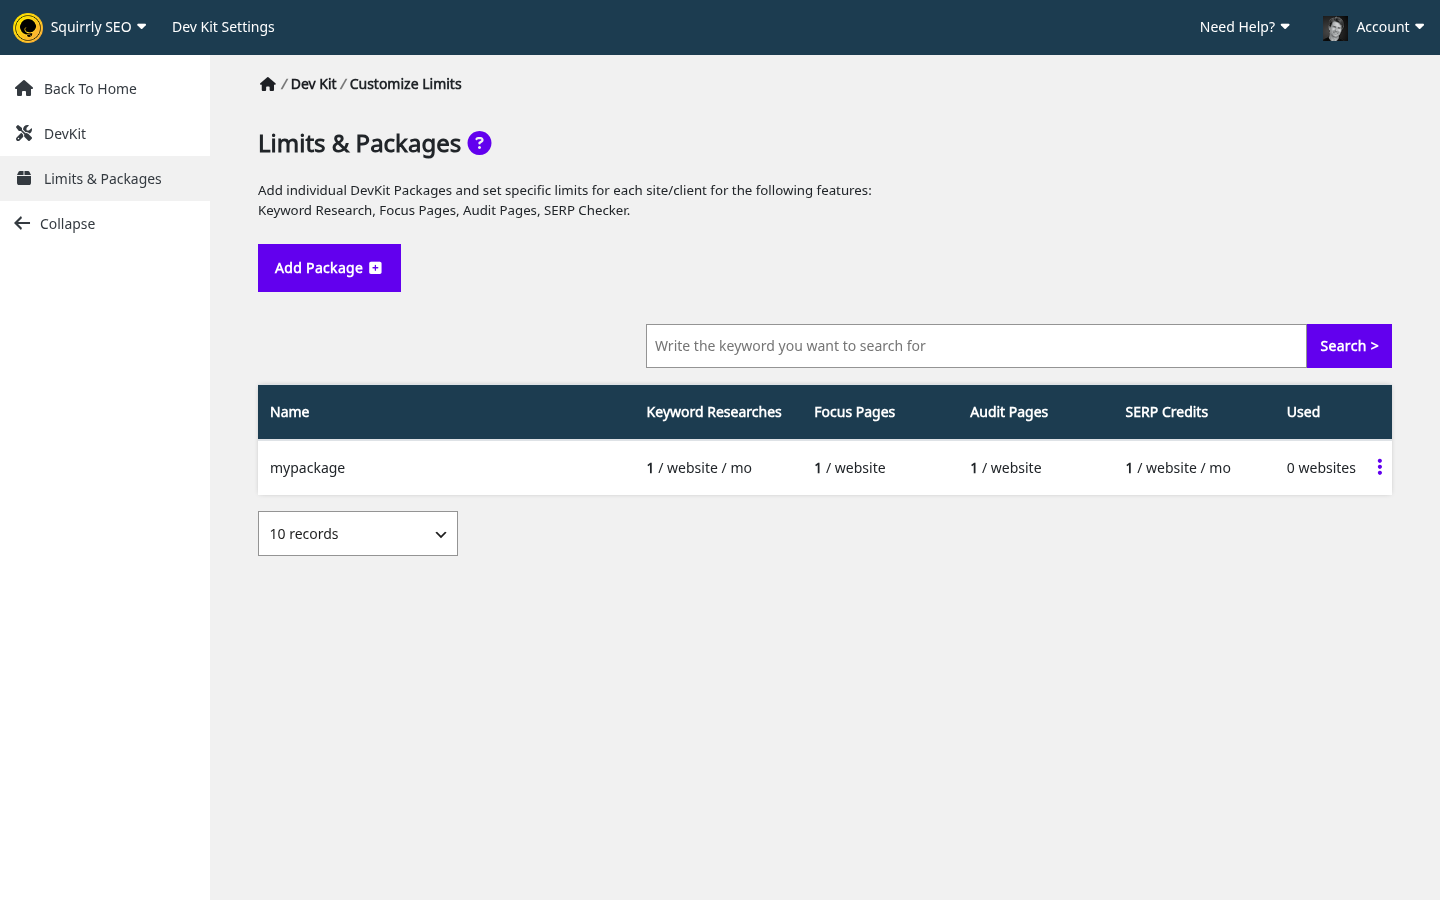
To give a site its package, click the box icon on its row in Connected Websites, choose it in Select DevKit Package and click Set Package. A site with no package and no default gets your plan’s limits.
The limits you can set depend on your own plan. The client sees the package limits in the account block of the plugin, and only while Show Account Info is on. Limits & Packages in the Cloud guide has every field and the delete rules.
What stays the same
- The Squirrly Cloud links in the plugin open the Cloud login page on Dev Kit accounts, without the one-click sign-in.
- Import Everything in Import & Data keeps the Dev Kit logo, names, audit texts and menu switches, whatever the backup file holds.
- On a WordPress multisite, the menu switches of the main site apply to every site in the network.
- The word Squirrly and squirrly.co help links still show in many plugin screens.
When the Dev Kit subscription lapses, the name, logo and menu switches stop applying and the site shows standard Squirrly SEO. When the subscription lapses has the details.
Troubleshooting
The custom logo or menu name doesn’t show
Both need the plugin connected to an account with the Dev Kit. Open Squirrly > Home on the client site and check the connection, then check the plan of that account.
A change in Dev Kit Settings doesn’t reach the client site
The name, logo, switches and audit texts come with the ZIP. Save the new options, download a new ZIP and install it on the client site again.
The Download button says Save the Plugin details first
Only saved options can be downloaded, so click Save DevKit Options first.
The Redirects item doesn’t show with Show Redirects on
Turn on Activate Redirects as well, save and install a new ZIP. Show LLM Indexing and Show Inner Links have the same pairing.
The package settings didn’t apply on a site that already had Squirrly
Follow the steps in Using the Web Dev Kit on a Website where Squirrly SEO is Already Installed.
Frequently asked questions
Does a hidden menu item turn the feature off?
No, the switches in Menu Options only hide the item, and the feature keeps working.
Do I need to reinstall the ZIP for updates?
No, the client site updates from the Plugins screen like any plugin, and a new ZIP is only needed when you change the name, the logo, the switches or the audit texts.
Can the client change the custom settings later?
Yes, they are the starting values and the client can change them in the plugin.
Can the client open Squirrly Cloud?
The Cloud links open the login page, and Can I only give the SEO plugin without cloud access to my clients? covers the rest.
Related tutorials
- Web Dev Kit in Squirrly Cloud: the screens, plans, ZIP and packages.
- Dev Kit Advantages: what the Dev Kit gives an agency, in short.
- Using the Web Dev Kit on a Website where Squirrly SEO is Already Installed: install over an existing plugin.
- How do I update the Squirrly plugin if it is rebuilt with the Web Dev Kit?: updates on client sites.
- Are the settings after activating the WebDevKit set once?: what happens to Custom Settings later.
- As an agency, if a client stops using us, what should we do with installed Squirrly on their website?: when a client leaves.
- Can I only give the SEO plugin without cloud access to my clients?: Cloud access for clients.